マニュアル
- Unity User Manual 2021.2
- New in Unity 2021.2
- パッケージと機能セット
- リリースパッケージ
- 2D Animation
- 2D Pixel Perfect
- 2D PSD Importer
- 2D SpriteShape
- 2D Tilemap Extras
- Adaptive Performance
- Addressables
- Advertisement
- Alembic
- Analytics Library
- Android Logcat
- Animation Rigging
- AR Foundation
- ARCore XR Plugin
- ARKit Face Tracking
- ARKit XR Plugin
- Burst
- Cinemachine
- Code Coverage
- Editor Coroutines
- FBX Exporter
- In App Purchasing
- Input System
- iOS 14 Advertising Support
- JetBrains Rider Editor
- Live Capture
- Localization
- Magic Leap XR Plugin
- ML Agents
- Mobile Notifications
- Oculus XR Plugin
- OpenXR Plugin
- Polybrush
- Post Processing
- ProBuilder
- Profile Analyzer
- Recorder
- Remote Config
- Scriptable Build Pipeline
- Sequences
- Terrain Tools
- Test Framework
- TextMeshPro
- Timeline
- Tutorial Authoring Tools
- Tutorial Framework
- Unity Distribution Portal (UDP)
- Version Control
- Visual Scripting
- Visual Studio Code Editor
- Visual Studio Editor
- WebGL Publisher
- XR Plugin Management
- リリース候補
- プレリリースパッケージ
- コアパッケージ
- ビルトインパッケージ
- AI
- Android JNI
- Animation
- Asset Bundle
- Audio
- Cloth
- Director
- Image Conversion
- IMGUI
- JSONSerialize
- NVIDIA
- Particle System
- Physics
- Physics 2D
- Screen Capture
- Terrain
- Terrain Physics
- Tilemap
- UI
- UIElements
- Umbra
- Unity Analytics
- Unity Web Request
- Unity Web Request Asset Bundle
- Unity Web Request Audio
- Unity Web Request Texture
- Unity Web Request WWW
- Vehicles
- Video
- VR
- Wind
- XR
- 実験的パッケージ
- パッケージをキーワードで探す
- Unity の Package Manager
- カスタムパッケージの作成
- Feature (機能) セット
- リリースパッケージ
- Unity を使用する
- Unity のインストール
- Unity のアップグレード
- API アップデーター
- Upgrading to Unity 2021.2
- Upgrading to Unity 2021.1
- Unity 2020 LTS へのアップグレード
- Unity 2019 LTS へのアップグレード
- Unity 2018 LTS へのアップグレード
- Legacy Upgrade Guides
- Unity のインターフェース
- クイックスタートガイド
- ゲームの作成
- エディター機能
- 分析
- Unity のメモリ
- プロファイラー概要
- アプリケーションのプロファイル
- よく使われるプロファイラーマーカー
- Profiler ウィンドウ
- Asset Loading Profiler モジュール
- Audio Profiler モジュール
- CPU Usage Profiler モジュール
- File Access Profiler モジュール
- Global Illumination Profiler モジュール
- GPU Usage Profiler モジュール
- Memory Profiler モジュール
- Physics プロファイラーモジュール
- 2D Physics プロファイラーモジュール
- Rendering Profiler モジュール
- UI Profiler と UI Details Profiler
- Video Profiler モジュール
- Virtual Texturing プロファイラーモジュール
- Profiler のカスタマイズ
- 低レベルのネイティブプラグイン Profiler API
- プロファイリングツール
- ログファイル
- Unity における最適化
- アセットローディングメトリクス
- アセットワークフロー
- 入力
- 2D
- 2D ゲーム開発クイックスタートガイド
- 2D ソート
- スプライト
- Tilemap
- 2D 物理演算リファレンス
- グラフィックス
- レンダーパイプライン
- カメラ
- ポストプロセス
- ライティング
- モデル
- メッシュ
- テクスチャ
- シェーダー
- シェーダーの基礎概念
- ビルトインシェーダー
- Shader Graph の使用
- シェーダーの作成
- シェーダー作成の概要
- ShaderLab
- ShaderLab: シェーダーオブジェクトの定義
- ShaderLab: SubShader の定義
- ShaderLab: パスの定義
- ShaderLab: シェーダープログラムの追加
- ShaderLab: パッケージの要件を指定する
- ShaderLab: コマンド
- ShaderLab: Category ブロックによるコマンドのグループ化
- ShaderLab コマンド: AlphaToMask
- ShaderLab コマンド: Blend
- ShaderLab コマンド: BlendOp
- ShaderLab コマンド: ColorMask
- ShaderLab コマンド: Conservative
- ShaderLab コマンド: Cull
- ShaderLab コマンド: Offset
- ShaderLab コマンド: Stencil
- ShaderLab コマンド: UsePass
- ShaderLab コマンド: GrabPass
- ShaderLab コマンド: ZClip
- ShaderLab コマンド: ZTest
- ShaderLabコマンド: ZWrite
- ShaderLab の古い機能
- Unity での HLSL
- Unity での GLSL
- シェーダーの例
- サーフェスシェーダーの記述
- 様々なグラフィックス API のシェーダーの作成
- シェーダーのパフォーマンスとプロファイリング
- マテリアル
- パーティクルシステム
- パーティクルシステムソリューションの選択
- ビルトインのパーティクルシステム
- ビルトインパーティクルシステムの使用
- パーティクルシステム - 頂点ストリームとスタンダードシェーダーサポート
- パーティクルシステム GPU インスタンス
- パーティクルシステム C# Job System インテグレーション
- コンポーネントとモジュール
- パーティクルシステム
- Particle System モジュール
- メインモジュール
- Emission モジュール
- Shape モジュール
- Velocity Over Lifetime モジュール
- Noise モジュール
- Limit Velocity over Lifetime module
- Inherit Velocity モジュール
- Lifetime by Emitter Speed module
- Force over Lifetime module
- Color over Lifetime module
- Color by Speed module
- Size Over Lifetime モジュール
- Size by Speed モジュール
- Rotation over Lifetime module
- Rotation by Speed module
- External Forces モジュール
- Collision モジュール
- Triggers モジュール
- Sub Emitters モジュール
- Texture Sheet Animation モジュール
- Lights モジュール
- Trails モジュール
- Custom Data モジュール
- Renderer モジュール
- Particle System Force Field
- Visual Effect Graph
- 環境の作成
- 空
- ビジュアルエフェクトのコンポーネント
- 色
- グラフィックス API サポート
- グラフィックスパフォーマンスの最適化
- 物理演算
- スクリプト
- マルチプレイヤーとネットワーク
- マルチプレイヤーゲーム作成の概要
- マルチプレイヤープロジェクトの設定
- NetworkManager の使用
- Network Manager HUD の使用
- Network Manager HUD の LAN モード
- マッチメーカーモードの Network Manager HUD
- シングルプレイヤーゲームを Unity Multiplayer に変換
- デバッグ情報
- マルチプレイヤー高レベル API
- Multiplayer コンポーネントリファレンス
- Multiplayer クラスリファレンス
- Multiplayer 暗号化プラグイン
- UnityWebRequest
- オーディオ
- オーディオの概要
- オーディオファイル
- トラッカーモジュール
- Audio Mixer
- ネイティブオーディオプラグイン SDK
- Audio プロファイラー
- アンビソニックオーディオ
- オーディオリファレンス
- オーディオクリップ
- Audio Listener
- オーディオソース
- Audio Mixer
- Audio Filter
- Audio Effect
- Audio Low Pass Effect
- Audio High Pass Effect
- Audio Echo Effect
- Audio Flange Effect
- Audio Distortion Effect
- Audio Normalize Effect
- Audio Parametric Equalizer Effect
- Audio Pitch Shifter Effect
- Audio Chorus Effect
- Audio Compressor Effect
- Audio SFX Reverb Effect
- Audio Low Pass Simple Effect
- Audio High Pass Simple Effect
- Reverb Zones
- Microphone(マイク)
- Audio Settings
- ビデオの概要
- アニメーション
- ユーザーインターフェース (UI) の作成
- Unity の UI システムの比較
- UI Toolkit
- Unity UI
- IMGUI (即時モードの GUI)
- ナビゲーションと経路探索
- ナビゲーションの概要
- ナビゲーション リファレンス
- ナビゲーションの使いかた
- Unity サービス
- Unity Services のためのプロジェクトの設定
- Unity Organizations
- Unity Ads
- Unity Analytics
- Unity Cloud Build
- Unity Cloud Content Delivery
- Unity IAP
- Unity IAP の設定
- クロスプラットフォームガイド
- ストア ガイド
- ストアの実装
- Unity Collaborate
- Unity Collaborate の設定
- Unity プロジェクトにチームメンバーを加える
- Unity Collaborate の履歴
- Collaborate で Cloud Build を有効にする
- Unity エディターのバージョンの管理
- ファイルを元に戻す
- ファイル競合の解決
- Collaborate への公開時に特定のアセットを除外する
- Collaborate に個別にファイルを公開する
- プロジェクトを以前のバージョンに復元する
- 「編集中」の表示
- クラウドストレージの管理
- プロジェクトを別のバージョン管理システムに移行する
- Unity Accelerator
- Collaborate のトラブルシューティングのヒント
- Unity Cloud Diagnostics
- Unity Integration
- Multiplayer
- Unity Distribution Portal (UDP)
- XR
- オープンソースリポジトリ
- Unity の Asset Store
- プラットフォーム特有の情報
- Unity as a Library を他のアプリケーションで使用
- ディープリンク
- Xcode フレームデバッガーのインテグレーション
- Android
- iOS
- Linux
- macOS
- tvOS
- WebGL
- Windows
- Unity を Windows と UWP アプリケーションへ統合
- Windows 全般
- ユニバーサル Windows プラットフォーム
- Getting Started
- Universal Windows Platform: Deployment
- Universal Windows Platform (UWP) build settings
- Windows Device Portal Deployment
- Universal Windows Platform: Profiler
- Universal Windows Platform: Command line arguments
- Universal Windows Platform: Association launching
- AppCallbacks class
- Universal Windows Platform: WinRT API in C# scripts
- ユニバーサル Windows プラットフォームの Player 設定
- Deep linking on Universal Windows Platform
- Universal Windows Platform: IL2CPP scripting back end
- FAQ
- Universal Windows Platform: Examples
- Universal Windows Platform: Code snippets
- Known issues
- Unity Search
- 古いトピック
- 用語集
- Unity User Manual 2021.2
- ユーザーインターフェース (UI) の作成
- UI Toolkit
- UI Builder
- Styling UI
- Styling USS selectors with UI Builder
Styling USS selectors with UI Builder
Manage USS Selectors
Unity style sheet (USS) Selectors are queries into the element hierarchy. They look like this in USS:
.my-button {
  background-color: blue;
}
The above USS Selector looks for all elements that have the class or tag .my-button and any matching elements will get the background color blue.
You can use USS Selectors inside StyleSheets to share styles across elements and UI Documents (UXML). You can create a new USS Selectors through the Add new selector… field at the top of the StyleSheets pane.
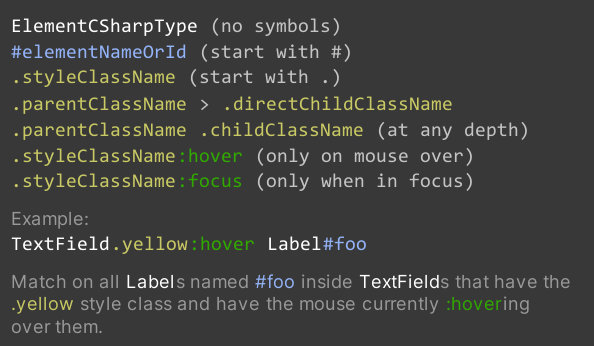
When you have the Add new selector… field in focus, a USS Selector syntax reference appears on top of the Viewport, as shown in the image below:

USS セレクターを操作する
To cut/copy/paste/delete one or more USS Selectors in the StyleSheets pane, select the group, right-click, and choose the desired action.
When you copy a USS Selector in the StyleSheets pane, what actually gets copied to the copy/paste buffer is the USS text representation of the USS Selector. This means you can paste it in a text editor directly or, the opposite, copy some USS text and paste it in the UI Builder.
Matching USS Selectors to elements
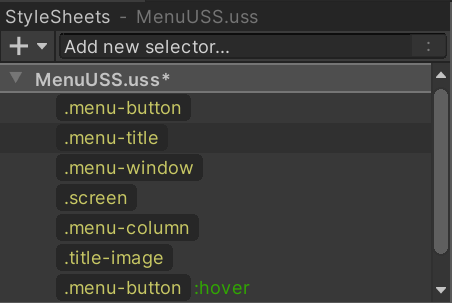
It’s recommended to use style classes to match elements instead of their C# type or name attribute. The image below displays the StyleSheets pane containing USS style class labels:

You can have a USS Selector match an element by adding a style class (or “tag”) used in the USS Selector to the element. You can add a style class to an element in two ways:
- Drag a style class label, like
 , onto the element in either the Hierarchy or the Canvas.
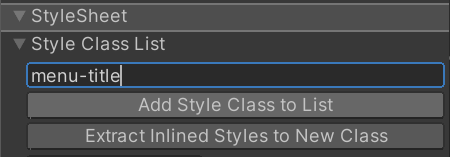
 - Select the element and enter the name of the style class in the field at the top of the StyleSheet section in the Inspector.
- Click the Add Style Class to List button:

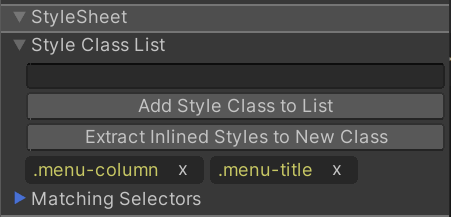
To see what style classes are already applied to an element, look at the yellow style class labels in the StyleSheet section of the Inspector:

You can double-click on a yellow style class labels to jump to a USS Selector that uses it as its only query, if one exists in the attached StyleSheets.
If a yellow style class label appears faded, the UI Builder couldn’t find a USS selector in the attached StyleSheets that contains this class in its query. You can double-click on a faded yellow class label to create a new USS selector in the Active StyleSheet that looks for this style class.
Did you find this page useful? Please give it a rating:
Thanks for rating this page!
What kind of problem would you like to report?
Thanks for letting us know! This page has been marked for review based on your feedback.
If you have time, you can provide more information to help us fix the problem faster.
Provide more information
You've told us this page needs code samples. If you'd like to help us further, you could provide a code sample, or tell us about what kind of code sample you'd like to see:
You've told us there are code samples on this page which don't work. If you know how to fix it, or have something better we could use instead, please let us know:
You've told us there is information missing from this page. Please tell us more about what's missing:
You've told us there is incorrect information on this page. If you know what we should change to make it correct, please tell us:
You've told us this page has unclear or confusing information. Please tell us more about what you found unclear or confusing, or let us know how we could make it clearer:
You've told us there is a spelling or grammar error on this page. Please tell us what's wrong:
You've told us this page has a problem. Please tell us more about what's wrong:
Thank you for helping to make the Unity documentation better!
Your feedback has been submitted as a ticket for our documentation team to review.
We are not able to reply to every ticket submitted.