컨트롤
IMGUI 컨트롤 타입
다양한 IMGUI 컨트롤 을 생성할 수 있습니다. 이 섹션에서는 사용 가능한 모든 디스플레이 및 상호 작용 컨트롤을 보여줍니다. 컨트롤의 레이아웃에 영향을 주는 다른 IMGUI 함수는 가이드의 레이아웃 섹션을 참조하십시오.
Label
Label 은 비상호작용적 컨트롤입니다. 이는 디스플레이 목적으로만 사용되며 클릭하거나 움직일 수 없습니다. 정보 표시 목적으로만 사용하는 것이 좋습니다.
/* GUI.Label example */

using UnityEngine;
using System.Collections;

public class GUITest : MonoBehaviour
{

    void OnGUI ()
    {
        GUI.Label (new Rect (25, 25, 100, 30), "Label");
    }

}

Button
Button 은 일반적인 상호작용 버튼입니다. 마우스를 누르는 시간과는 무관하게 이 버튼을 클릭하면 한 번 반응합니다. 반응은 마우스 버튼에서 손을 떼는 즉시 일어납니다.
기본 사용 방법
UnityGUI에서는 버튼을 클릭하면 true 값이 반환됩니다. 버튼을 클릭할 때 일부 코드를 실행하려면 if 문에 GUI.Button 함수를 래핑하면 됩니다. 버튼을 클릭할 때 if 문의 코드가 실행됩니다.
/* GUI.Button example */

using UnityEngine;
using System.Collections;

public class GUITest : MonoBehaviour
{

    void OnGUI ()
    {
        if (GUI.Button (new Rect (25, 25, 100, 30), "Button"))
        {
            // This code is executed when the Button is clicked
        }
    }

}

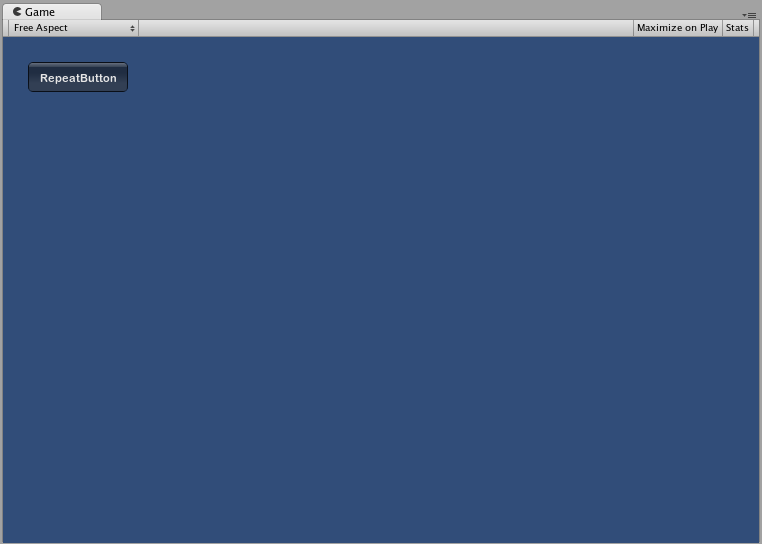
RepeatButton
RepeatButton 은 일반 Button 의 배리에이션입니다. RepeatButton 은 마우스 버튼이 눌려져 있는 상태에서 프레임마다 반응한다는 점이 다릅니다. 이렇게 하면 클릭 후 누르기 기능을 생성할 수 있습니다.
기본 사용 방법
UnityGUI에서는 RepeatButtons를 클릭하는 프레임마다 true 값이 반환됩니다. 버튼이 클릭되어 있는 동안 일부 코드를 실행하려면 if 문에 GUI.RepeatButtons 함수를 래핑하면 됩니다. RepeatButtons이 클릭되어 있는 동안 if 문의 코드가 실행됩니다.
/* GUI.RepeatButton example */

using UnityEngine;
using System.Collections;

public class GUITest : MonoBehaviour
{

    void OnGUI ()
    {
        if (GUI.RepeatButton (new Rect (25, 25, 100, 30), "RepeatButton"))
        {
            // This code is executed every frame that the RepeatButton remains clicked
        }
    }

}
TextField
TextField 컨트롤은 텍스트 문자열을 포함하는 상호작용적인 단일 행 필드입니다.
기본 사용 방법
TextField는 항상 문자열을 표시합니다. 따라서 TextField에 표시될 문자열을 항상 제공해야 합니다. 문자열이 수정된 경우 TextField 함수는 수정된 문자열을 반환합니다.
/* GUI.TextField example */

using UnityEngine;
using System.Collections;

public class GUITest : MonoBehaviour
{

    private string textFieldString = "text field";

    void OnGUI ()
    {
        textFieldString = GUI.TextField (new Rect (25, 25, 100, 30), textFieldString);
    }

}

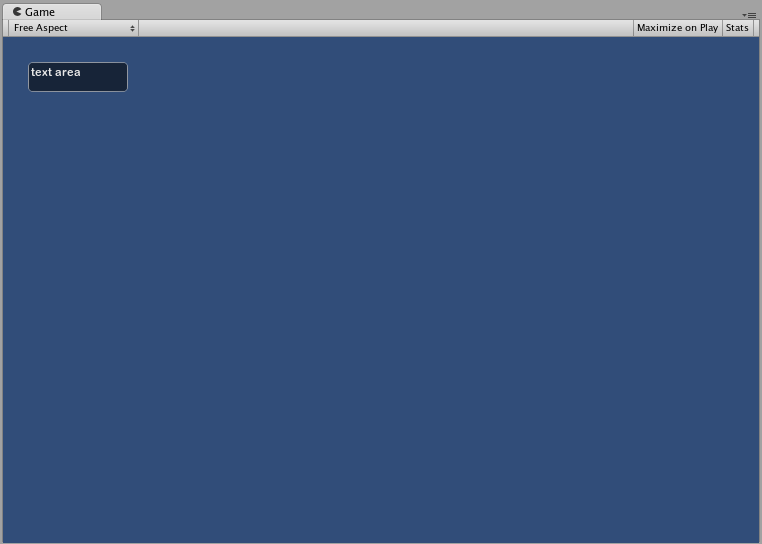
TextArea
TextArea 컨트롤은 텍스트 문자열을 포함하는 상호작용적이며 편집 가능한 여러 행의 영역입니다.
기본 사용 방법
TextArea는 항상 문자열을 표시합니다. 따라서 TextArea에 표시될 문자열을 항상 제공해야 합니다. 문자열이 수정된 경우 TextArea 함수는 수정된 문자열을 반환합니다.
/* GUI.TextArea example */

using UnityEngine;
using System.Collections;

public class GUITest : MonoBehaviour
{

    private string textAreaString = "text area";

    void OnGUI ()
    {
        textAreaString = GUI.TextArea (new Rect (25, 25, 100, 30), textAreaString);
    }

}
Toggle
Toggle 컨트롤은 켜기/끄기 상태를 전환하는 체크박스를 생성합니다. 박스를 클릭하여 상태를 변경할 수 있습니다.
기본 사용 방법
토글의 켜기/끄기 상태는 true/false 부울 값으로 표시됩니다. 따라서 토글이 실제 상태를 나타내도록 하려면 부울 값을 파라미터로 제공해야 합니다. Toggle 함수는 클릭될 경우 새로운 부울 값을 반환합니다. 이 상호 작용을 캡처하려면 부울 값을 할당하여 Toggle 함수의 반환 값을 수락해야 합니다.
/* GUI.Toggle example */

using UnityEngine;
using System.Collections;

public class GUITest : MonoBehaviour
{
    private bool toggleBool = true;

    void OnGUI ()
    {
        toggleBool = GUI.Toggle (new Rect (25, 25, 100, 30), toggleBool, "Toggle");
    }
}

Toolbar
Toolbar 컨트롤은 기본적으로 Buttons 의 행입니다. 툴바의 버튼 중 하나만 활성화될 수 있으며 다른 버튼이 클릭되기 전까지 활성 상태로 남게 됩니다. 이 동작은 일반적인 툴바의 동작을 에뮬레이트합니다. 툴바의 버튼 수는 임의로 정의할 수 있습니다.
기본 사용 방법
툴바에서 활성화된 버튼은 정수 값을 통해 추적됩니다. 따라서 정수를 함수의 인수로 제공해야 합니다. 툴바를 상호작용할 수 있게 만들려면 정수 값을 함수의 반환 값에 할당해야 합니다. 콘텐츠 배열에서 제공하는 요소의 수는 툴바에 표시되는 버튼 수를 결정합니다.
/* GUI.Toolbar example */

using UnityEngine;
using System.Collections;

public class GUITest : MonoBehaviour
{

    private int toolbarInt = 0;
    private string[] toolbarStrings = {"Toolbar1", "Toolbar2", "Toolbar3"};

    void OnGUI ()
    {
        toolbarInt = GUI.Toolbar (new Rect (25, 25, 250, 30), toolbarInt, toolbarStrings);
    }

}

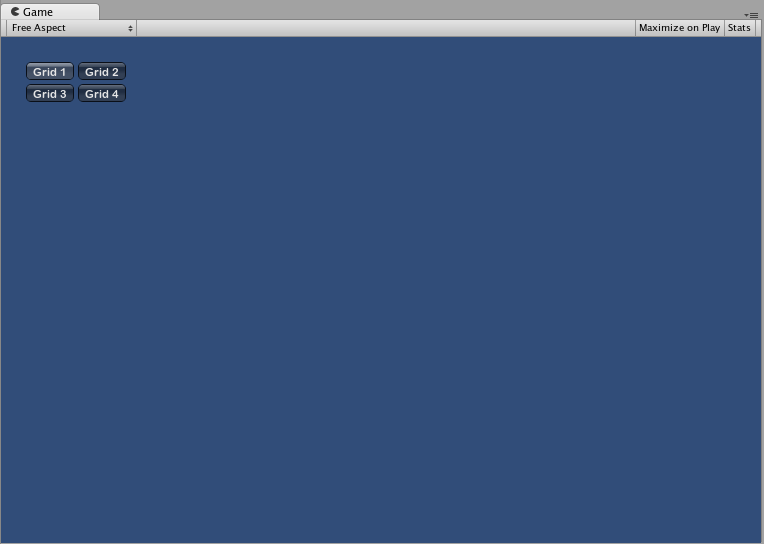
SelectionGrid
SelectionGrid 컨트롤은 여러 행의 Toolbar 입니다. 격자 무늬에서 열과 행의 수를 결정할 수 있습니다. 한 번에 버튼 하나만 활성화할 수 있습니다.
기본 사용 방법
SelectionGrid에서 활성화된 버튼은 정수로 추적됩니다. 따라서 정수를 함수의 인수로 제공해야 합니다. SelectionGrid를 상호작용할 수 있게 만들려면 정수 값을 함수의 반환 값에 할당해야 합니다. 콘텐츠 배열에서 제공하는 요소의 수는 SelectionGrid에서 표시되는 버튼의 수를 결정합니다. 함수의 인수로 열의 수를 정할 수도 있습니다.
/* GUI.SelectionGrid example */

using UnityEngine;
using System.Collections;

public class GUITest : MonoBehaviour
{

    private int selectionGridInt = 0;
    private string[] selectionStrings = {"Grid 1", "Grid 2", "Grid 3", "Grid 4"};

    void OnGUI ()
    {
        selectionGridInt = GUI.SelectionGrid (new Rect (25, 25, 300, 60), selectionGridInt, selectionStrings, 2);

    }

}
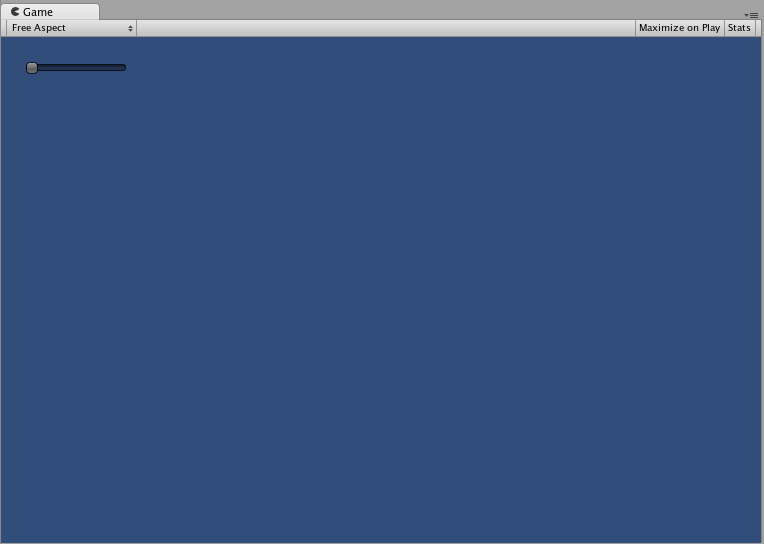
HorizontalSlider
HorizontalSlider 컨트롤은 미리 설정된 최소 값과 최대 값 사이의 값을 변경하기 위해 드래그할 수있는 일반적인 수평 슬라이딩 노브입니다.
기본 사용 방법
슬라이더 노브의 포지션은 플로트로 저장됩니다. 노브의 포지션을 표시하려면 함수의 인수 중 하나인 플로트를 제공해야 합니다. 최소 값과 최대 값을 결정하는 두 가지 추가 값이 있습니다. 슬라이더 노브를 조절하려면 슬라이더 값 플로트를 Slider 함수의 반환 값으로 할당합니다.
/* Horizontal Slider example */

using UnityEngine;
using System.Collections;

public class GUITest : MonoBehaviour
{

    private float hSliderValue = 0.0f;

    void OnGUI ()
    {
        hSliderValue = GUI.HorizontalSlider (new Rect (25, 25, 100, 30), hSliderValue, 0.0f, 10.0f);
    }

}
VerticalSlider
VerticalSlider 컨트롤은 미리 설정된 최소 값과 최대 값 사이의 값을 변경하기 위해 드래그할 수 있는 일반적인 수직 슬라이딩 노브입니다.
기본 사용 방법
슬라이더 노브의 포지션은 플로트로 저장됩니다. 노브의 포지션을 표시하려면 함수의 인수 중 하나인 플로트를 제공해야 합니다. 최소 값과 최대 값을 결정하는 두 가지 추가 값이 있습니다. 슬라이더 노브를 조절하려면 슬라이더 값 플로트를 Slider 함수의 반환 값으로 할당합니다.
/* Vertical Slider example */

using UnityEngine;
using System.Collections;

public class GUITest : MonoBehaviour
{

    private float vSliderValue = 0.0f;

    void OnGUI ()
    {
        vSliderValue = GUI.VerticalSlider (new Rect (25, 25, 100, 30), vSliderValue, 10.0f, 0.0f);
    }

}

HorizontalScrollbar
HorizontalScrollbar 컨트롤은 Slider 컨트롤과 비슷하지만 시각적으로 웹 브라우저 또는 워드 프로세서의 스크롤 요소와 유사합니다. 이 컨트롤은 ScrollView 컨트롤을 탐색하는 데 사용됩니다.
기본 사용 방법
수평 스크롤 막대는 수평 슬라이더와 동일하게 구현되지만, 스크롤 막대 노브 자체의 너비를 제어하는 추가 인수가 있다는 점만 다릅니다.
/* Horizontal Scrollbar example */

using UnityEngine;
using System.Collections;

public class GUITest : MonoBehaviour
{
    private float hScrollbarValue;

    void OnGUI ()
    {
        hScrollbarValue = GUI.HorizontalScrollbar (new Rect (25, 25, 100, 30), hScrollbarValue, 1.0f, 0.0f, 10.0f);
    }

}

VerticalScrollbar
VerticalScrollbar 컨트롤은 Slider 컨트롤과 비슷하지만 시각적으로 웹 브라우저 또는 워드 프로세서의 스크롤 요소와 유사합니다. 이 컨트롤은 ScrollView 컨트롤을 탐색하는 데 사용됩니다.
기본 사용 방법
수직 스크롤 막대는 수직 슬라이더와 동일하게 구현되지만, 스크롤 막대 노브 자체의 높이를 제어하는 추가 인수가 있다는 점만 다릅니다.
/* Vertical Scrollbar example */

using UnityEngine;
using System.Collections;

public class GUITest : MonoBehaviour
{

    private float vScrollbarValue;

    void OnGUI ()
    {
        vScrollbarValue = GUI. VerticalScrollbar (new Rect (25, 25, 100, 30), vScrollbarValue, 1.0f, 10.0f, 0.0f);
    }
}
ScrollView
ScrollViews 는 훨씬 더 큰 컨트롤 집합의 볼 수 있는 영역을 표시하는 컨트롤입니다.
기본 사용 방법
ScrollViews에는 인수로 두 개의 Rect 가 필요합니다. 첫 번째 Rect 는 스크린에서 볼 수 있는 ScrollView 영역의 포지션과 크기를 정의합니다. 두 번째 Rect 는 볼 수 있는 영역 안에 포함된 공간의 크기를 정의합니다. 표시 영역 내부의 공간이 표시 영역보다 큰 경우 스크롤 막대가 적절하게 표시됩니다. 또한 표시된 보이는 영역의 포지션을 저장하는 2D 벡터를 할당하고 제공해야 합니다.
/* ScrollView example */

using UnityEngine;
using System.Collections;

public class GUITest : MonoBehaviour
{

    private Vector2 scrollViewVector = Vector2.zero;
    private string innerText = "I am inside the ScrollView";

    void OnGUI ()
    {
        // Begin the ScrollView
        scrollViewVector = GUI.BeginScrollView (new Rect (25, 25, 100, 100), scrollViewVector, new Rect (0, 0, 400, 400));

        // Put something inside the ScrollView
        innerText = GUI.TextArea (new Rect (0, 0, 400, 400), innerText);

        // End the ScrollView
        GUI.EndScrollView();
    }

}

Window
Windows 는 드래그 가능한 컨트롤 컨테이너입니다. 클릭하면 초점을 받거나 잃을 수 있으므로 다른 컨트롤과 약간 다르게 구현됩니다. 각 창에는 ID 번호가 있으며, 그 내용은 창에 포커스가 있을 때 호출되는 별도의 함수에서 선언됩니다.
기본 사용 방법
창은 추가 함수가 제대로 작동해야 하는 유일한 컨트롤입니다. 창에서 실행될 ID 번호와 함수 이름을 제공해야 합니다. Window 함수에서 실제 동작 또는 포함된 컨트롤을 만듭니다.
/* Window example */

using UnityEngine;
using System.Collections;

public class GUITest : MonoBehaviour
{

    private Rect windowRect = new Rect (20, 20, 120, 50);

    void OnGUI ()
    {
        windowRect = GUI.Window (0, windowRect, WindowFunction, "My Window");
    }

    void WindowFunction (int windowID)
    {
        // Draw any Controls inside the window here
    }

}

GUI.changed
사용자가 GUI에서 버튼을 클릭하거나, 슬라이더를 드래그하는 등과 같은 행동을 했는지 감지하려면 스크립트에서 GUI.changed 값을 읽어 들이면 됩니다. 이 값은 사용자가 행동을 한 경우 true로 설정되므로, 사용자 입력을 검증하기 쉽게 만듭니다.
일반적인 예시로는 툴바가 있습니다. 툴바의 각 버튼을 클릭하면 특정 값을 변경하고자 하는 경우, 모든 호출 값을 OnGUI() 에 할당할 필요는 없습니다. 버튼 중 한 개가 클릭 되었을 때의 호출 값을 할당하면 되기 때문입니다.
/* GUI.changed example */

using UnityEngine;
using System.Collections;

public class GUITest : MonoBehaviour
{

    private int selectedToolbar = 0;
    private string[] toolbarStrings = {"One", "Two"};

    void OnGUI ()
    {
        // Determine which button is active, whether it was clicked this frame or not
        selectedToolbar = GUI.Toolbar (new Rect (50, 10, Screen.width - 100, 30), selectedToolbar, toolbarStrings);

        // If the user clicked a new Toolbar button this frame, we'll process their input
        if (GUI.changed)
        {
            Debug.Log("The toolbar was clicked");

            if (0 == selectedToolbar)
            {
                Debug.Log("First button was clicked");
            }
            else
            {
                Debug.Log("Second button was clicked");
            }
        }
    }

}
GUI 컨트롤이 사용자에 의해 조작되기 전에 배치된 경우 __GUI.changed__는 true 값을 반환합니다.
Did you find this page useful? Please give it a rating: