버텍스 데이터 시각화
빌트인 렌더 파이프라인에 대한 예제 셰이더는 버텍스 데이터를 시각화하는 다양한 방법을 보여줍니다.
셰이더 작성에 대한 자세한 내용은 셰이더 작성을 참조하십시오.
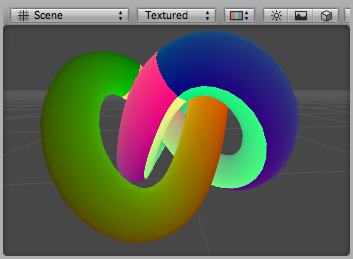
UV 시각화
다음 예제 셰이더는 메시의 첫 번째 UV 세트를 시각화합니다. 이 셰이더는 좌표를 디버깅하는 데 유용합니다.
이 코드는 appdata라는 구조를 버텍스 셰이더 입력으로 정의합니다. 이 구조는 버텍스 포지션과 첫 번째 텍스처 좌표를 입력으로 사용합니다.
Shader "Debug/UV 1" {
SubShader {
    Pass {
        CGPROGRAM
        #pragma vertex vert
        #pragma fragment frag
            #include "UnityCG.cginc"

        // vertex input: position, UV
        struct appdata {
            float4 vertex : POSITION;
            float4 texcoord : TEXCOORD0;
        };

        struct v2f {
            float4 pos : SV_POSITION;
            float4 uv : TEXCOORD0;
        };

        v2f vert (appdata v) {
            v2f o;
            o.pos = UnityObjectToClipPos(v.vertex);
            o.uv = float4( v.texcoord.xy, 0, 0 );
            return o;
        }

        half4 frag( v2f i ) : SV_Target {
            half4 c = frac( i.uv );
            if (any(saturate(i.uv) - i.uv))
                c.b = 0.5;
            return c;
        }
        ENDCG
    }
}
}
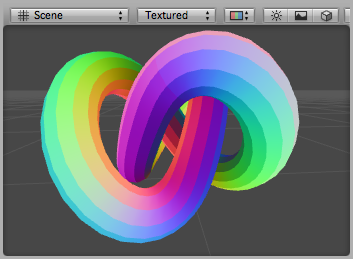
여기서 UV 좌표는 빨간색과 초록색으로 시각화되며 01 범위 밖의 좌표에는 추가 파란색 색조가 적용되었습니다.
동일한 셰이더의 배리에이션은 두 번째 UV 세트를 시각화합니다.
Shader "Debug/UV 2" {
SubShader {
    Pass {
        CGPROGRAM
        #pragma vertex vert
        #pragma fragment frag
            #include "UnityCG.cginc"

        // vertex input: position, second UV
        struct appdata {
            float4 vertex : POSITION;
            float4 texcoord1 : TEXCOORD1;
        };

        struct v2f {
            float4 pos : SV_POSITION;
            float4 uv : TEXCOORD0;
        };

        v2f vert (appdata v) {
            v2f o;
            o.pos = UnityObjectToClipPos(v.vertex );
            o.uv = float4( v.texcoord1.xy, 0, 0 );
            return o;
        }

        half4 frag( v2f i ) : SV_Target {
            half4 c = frac( i.uv );
            if (any(saturate(i.uv) - i.uv))
                c.b = 0.5;
            return c;
        }
        ENDCG
    }
}
}
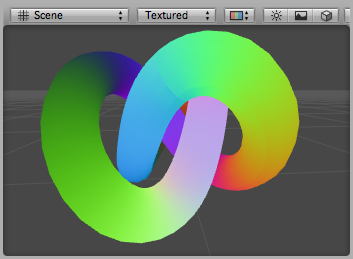
버텍스 컬러 시각화
다음 셰이더는 버텍스 포지션 및 버텍스당 컬러를 버텍스 셰이더 입력으로 사용합니다(appdata 구조에 정의됨).
Shader "Debug/Vertex color" {
SubShader {
    Pass {
        CGPROGRAM
        #pragma vertex vert
        #pragma fragment frag
        #include "UnityCG.cginc"

        // vertex input: position, color
        struct appdata {
            float4 vertex : POSITION;
            fixed4 color : COLOR;
        };

        struct v2f {
            float4 pos : SV_POSITION;
            fixed4 color : COLOR;
        };

        v2f vert (appdata v) {
            v2f o;
            o.pos = UnityObjectToClipPos(v.vertex );
            o.color = v.color;
            return o;
        }

        fixed4 frag (v2f i) : SV_Target { return i.color; }
        ENDCG
    }
}
}
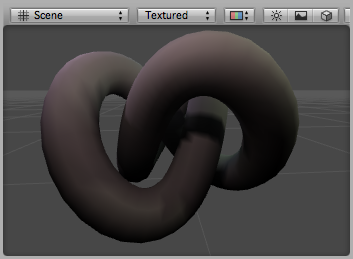
노멀 시각화
다음 셰이더는 버텍스 포지션 및 노멀을 버텍스 셰이더 입력으로 사용합니다(appdata 구조에 정의됨). 노멀의 X, Y, Z 컴포넌트는 RGB 컬러로 시각화됩니다. 노멀 컴포넌트가 –11 범위이기 때문에 컴포넌트를 스케일 및 바이어스하여 출력 컬러가 표시 가능한 01 범위에 들어오도록 만듭니다.
Shader "Debug/Normals" {
SubShader {
    Pass {
        CGPROGRAM
        #pragma vertex vert
        #pragma fragment frag
        #include "UnityCG.cginc"

        // vertex input: position, normal
        struct appdata {
            float4 vertex : POSITION;
            float3 normal : NORMAL;
        };

        struct v2f {
            float4 pos : SV_POSITION;
            fixed4 color : COLOR;
        };

        v2f vert (appdata v) {
            v2f o;
            o.pos = UnityObjectToClipPos(v.vertex );
            o.color.xyz = v.normal * 0.5 + 0.5;
            o.color.w = 1.0;
            return o;
        }

        fixed4 frag (v2f i) : SV_Target { return i.color; }
        ENDCG
    }
}
}
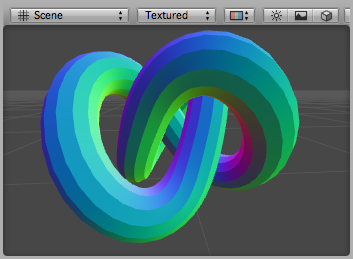
탄젠트 및 바이노멀 시각화
탄젠트 및 바이노멀 벡터는 노멀 매핑에 사용됩니다. Unity에서는 버텍스에 탄젠트 벡터만이 저장되며 바이노멀은 노멀과 탄젠트 값에서 파생됩니다.
다음 셰이더는 버텍스 포지션 및 탄젠트를 버텍스 셰이더 입력으로 사용합니다(appdata 구조에 정의됨). 탄젠트의 x, y, z 컴포넌트는 R, G, B 컬러로 시각화됩니다. 노멀 컴포넌트가 –11 범위이기 때문에 컴포넌트를 스케일 및 바이어스하여 출력 컬러가 표시 가능한 01 범위에 들어오도록 만듭니다.
Shader "Debug/Tangents" {
SubShader {
    Pass {
        CGPROGRAM
        #pragma vertex vert
        #pragma fragment frag
        #include "UnityCG.cginc"

        // vertex input: position, tangent
        struct appdata {
            float4 vertex : POSITION;
            float4 tangent : TANGENT;
        };

        struct v2f {
            float4 pos : SV_POSITION;
            fixed4 color : COLOR;
        };

        v2f vert (appdata v) {
            v2f o;
            o.pos = UnityObjectToClipPos(v.vertex );
            o.color = v.tangent * 0.5 + 0.5;
            return o;
        }

        fixed4 frag (v2f i) : SV_Target { return i.color; }
        ENDCG
    }
}
}
다음 셰이더는 바이노멀을 시각화합니다. 버텍스 포지션, 노멀, 탄젠트 값을 버텍스 입력으로 사용합니다. 바이탄젠트(바이노멀이라고도 함)는 노멀 및 탄젠트 값에서 계산됩니다. 표시 가능한 01 범위로 스케일하고 바이어스해야 합니다.
Shader "Debug/Bitangents" {
SubShader {
    Pass {
        Fog { Mode Off }
        CGPROGRAM
        #pragma vertex vert
        #pragma fragment frag
        #include "UnityCG.cginc"

        // vertex input: position, normal, tangent
        struct appdata {
            float4 vertex : POSITION;
            float3 normal : NORMAL;
            float4 tangent : TANGENT;
        };

        struct v2f {
            float4 pos : SV_POSITION;
            float4 color : COLOR;
        };

        v2f vert (appdata v) {
            v2f o;
            o.pos = UnityObjectToClipPos(v.vertex );
            // calculate bitangent
            float3 bitangent = cross( v.normal, v.tangent.xyz ) * v.tangent.w;
            o.color.xyz = bitangent * 0.5 + 0.5;
            o.color.w = 1.0;
            return o;
        }

        fixed4 frag (v2f i) : SV_Target { return i.color; }
        ENDCG
    }
}
}
Did you find this page useful? Please give it a rating: