매뉴얼
Version:
2021.2
- Unity 사용자 매뉴얼 2021.2
- Unity 2021.2의 새로운 기능
- 패키지와 기능 세트
- 릴리스된 패키지
- 2D 애니메이션
- 2D 픽셀 퍼펙트
- 2D PSD 임포터
- 2D SpriteShape
- 2D 타일맵 엑스트라
- 어댑티브 퍼포먼스
- 어드레서블
- 광고
- Alembic
- 분석 라이브러리
- Android 로그캣
- 애니메이션 리깅
- AR 파운데이션
- ARCore XR 플러그인
- ARKit 얼굴 추적
- ARKit XR 플러그인
- 버스트
- 시네머신
- 코드 커버리지
- 에디터 코루틴
- FBX 익스포터
- 인앱 구매
- 입력 시스템
- iOS 14 광고 지원
- Jetbrains Rider 에디터
- 라이브 캡처
- 현지화
- Magic Leap XR 플러그인
- ML 에이전트
- 모바일 알림
- Oculus XR 플러그인
- OpenXR 플러그인
- Polybrush
- 포스트 프로세싱
- ProBuilder
- 프로파일 분석기
- 레코더
- 원격 설정
- 스크립터블 빌드 파이프라인
- 시퀀스
- 터레인 툴
- 테스트 프레임워크
- TextMeshPro
- 타임라인
- 튜토리얼 저작 툴
- 튜토리얼 프레임워크
- Unity 퍼블리싱 포털
- 버전 관리
- 비주얼 스크립팅
- Visual Studio 코드 에디터
- Visual Studio 에디터
- WebGL 퍼블리셔
- XR 플러그인 관리
- 릴리스 후보(RC)
- 사전 릴리스 패키지
- 코어 패키지
- 빌트인 패키지
- 실험 단계 패키지
- 키워드별 패키지
- Unity의 패키지 관리자
- 커스텀 패키지 생성
- 기능 집합
- 릴리스된 패키지
- Unity에서 작업 수행
- Unity 설치
- Unity 업그레이드
- API 업데이터
- Unity 2021.2로 업그레이드
- Unity 2021.1로 업그레이드
- Unity 2020 LTS로 업그레이드
- Unity 2019 LTS로 업그레이드
- Unity 2018 LTS로 업그레이드
- 레거시 업그레이드 가이드
- Unity 인터페이스
- 퀵스타트 가이드
- 게임플레이 생성
- 에디터 기능
- 분석
- 에셋 워크플로
- 입력
- 2D
- 그래픽스
- 렌더 파이프라인
- 카메라
- 포스트 프로세싱
- 조명
- 모델(Models)
- 메시
- 텍스처
- 셰이더
- 셰이더의 핵심 개념
- 빌트인 셰이더
- 셰이더 그래프 사용
- 셰이더 작성
- 셰이더 작성 개요
- ShaderLab
- ShaderLab: 셰이더 오브젝트 정의
- ShaderLab: 서브셰이더 정의
- ShaderLab: 패스 정의하기
- ShaderLab: 셰이더 프로그램 추가
- ShaderLab: 패키지 요구 사항 지정하기
- ShaderLab: 커맨드
- ShaderLab: 카테고리 블록으로 커맨드 그룹화하기
- ShaderLab 커맨드: AlphaToMask
- ShaderLab 커맨드: Blend
- ShaderLab 커맨드: BlendOp
- ShaderLab 커맨드: ColorMask
- ShaderLab 커맨드: Conservative
- ShaderLab 커맨드: Cull
- ShaderLab 커맨드: Offset
- ShaderLab 커맨드: Stencil
- ShaderLab 커맨드: UsePass
- ShaderLab 커맨드: GrabPass
- ShaderLab 커맨드: ZClip
- ShaderLab 커맨드: ZTest
- ShaderLab 커맨드: ZWrite
- ShaderLab 레거시 기능
- Unity의 HLSL
- Unity의 GLSL
- 예제 셰이더
- 표면 셰이더 작성
- 여러 그래픽스 API를 위한 셰이더 작성
- 셰이더 성능 및 프로파일링
- 머티리얼
- 파티클 시스템
- 환경 생성
- 하늘
- 시각 효과 컴포넌트
- 컬러
- 그래픽스 API 지원
- 그래픽스 퍼포먼스 최적화
- 물리
- 스크립팅
- 멀티플레이어 및 네트워킹
- 네트워킹 개요
- 멀티플레이어 프로젝트 설정
- 네트워크 관리자 사용
- 네트워크 관리자 HUD 사용
- LAN 모드의 Network Manager HUD
- 매치메이커 모드의 Network Manager HUD
- 싱글 플레이어 게임을 Unity 멀티플레이어 게임으로 전환
- 디버깅 정보
- 멀티플레이어 고수준 API
- 멀티플레이어 컴포넌트 레퍼런스
- 멀티플레이어 클래스 레퍼런스
- 멀티플레이어 암호화 플러그인
- UnityWebRequest
- 오디오
- 동영상 개요
- 애니메이션
- 사용자 인터페이스(UI) 생성
- 내비게이션과 경로 탐색
- 내비게이션 개요
- 내비게이션 레퍼런스
- 내비게이션 작업 수행 방법
- Unity 서비스
- Unity 서비스를 위한 프로젝트 설정
- Unity 조직
- Unity 애즈
- Unity 애널리틱스
- Unity 클라우드 빌드
- Unity 클라우드 콘텐츠 제공
- Unity IAP
- Unity IAP 설정
- 크로스 플랫폼 가이드
- 스토어 가이드
- 스토어 구현
- Unity 콜라보레이트
- Unity 클라우드 다이어그노스틱
- Unity 통합
- 멀티플레이어 서비스
- Unity 퍼블리싱 포털
- XR
- 오픈 소스 저장소
- Unity의 에셋 스토어
- 플랫폼 개발
- 다른 애플리케이션에서 Unity as a Library 사용
- 딥 링크
- Xcode 프레임 디버거 Unity 통합
- Android
- iOS
- Linux
- macOS
- tvOS
- WebGL
- Windows
- Unity를 Windows 및 UWP 애플리케이션에 통합
- Windows 일반
- 유니버설 Windows 플랫폼
- 시작
- 유니버설 Windows 플랫폼: 배포
- 유니버설 Windows 플랫폼(UWP) 빌드 설정
- Windows 기기 포털 배포
- 유니버설 Windows 플랫폼: 프로파일러
- 유니버설 Windows 플랫폼: 커맨드 라인 인자
- 유니버설 Windows 플랫폼: 연관 실행
- AppCallbacks 클래스
- 유니버설 Windows 플랫폼: C# 스크립트의 WinRT API
- 유니버설 Windows 플랫폼 플레이어 설정
- 유니버설 Windows 플랫폼에서 딥 링크
- 유니버설 Windows 플랫폼: IL2CPP 스크립팅 백엔드
- FAQ
- 유니버설 Windows 플랫폼: 예제
- 유니버설 Windows 플랫폼: 코드 스니핏
- 알려진 문제
- Unity 검색
- 레거시 항목
- 용어집
에디터 창
애플리케이션에 커스텀 창을 얼마든지 생성할 수 있습니다. 커스텀 창은 인스펙터, 씬 또는 기타 빌트인 창처럼 작동합니다. 이 방법은 게임의 하위시스템에 사용자 인터페이스를 추가하는 데 유용합니다.
아래의 간단한 절차를 따라 커스텀 에디터 창을 만들 수 있습니다.
- 에디터 창에서 파생되는 스크립트를 작성합니다.
- 코드를 사용하여 창이 자동으로 표시되도록 합니다.
- 툴에 대한 GUI 코드를 구현합니다.
에디터 창에서 파생
커스텀 에디터 창을 만들기 위해서는 스크립트를 “Editor”라는 폴더 안에 저장해야 합니다. 에디터 창에서 파생되는 이 스크립트에 클래스를 만든 다음, 내부 OnGUI 함수에 GUI 컨트롤을 작성합니다.
using UnityEngine;
using UnityEditor;
using System.Collections;

public class Example : EditorWindow

    {
        void OnGUI () {
            // The actual window code goes here
           }
    }
_ 프로젝트 내 ‘Editor’ 폴더에 있는 MyWindow.js_
창 표시
화면에 창을 표시하려면 창을 표시하는 메뉴 아이템을 생성합니다. 이 작업은 MenuItem 프로퍼티를 통해 활성화되는 함수를 작성하여 수행합니다.
Unity의 기본 설정은 창을 재활용합니다 따라서 메뉴 아이템을 다시 선택하면 기존 창이 표시됩니다. 이 작업은 EditorWindow.GetWindow 함수를 사용하여 수행됩니다. 예제:
using UnityEngine;
using UnityEditor;
using System.Collections;

class MyWindow : EditorWindow {
    [MenuItem ("Window/My Window")]

    public static void  ShowWindow () {
        EditorWindow.GetWindow(typeof(MyWindow));
    }

    void OnGUI () {
        // The actual window code goes here
    }
}
MyWindow 표시
호출 간 포지션을 저장하거나 커스텀 레이아웃에 사용하는 등 도킹 가능한 스탠다드 에디터 창을 생성할 수 있습니다. 생성한 창에 더 많은 컨트롤을 적용하려면 GetWindowWithRect를 사용할 수 있습니다.
창의 GUI 구현
창의 실제 콘텐츠는 OnGUI 함수를 구현하여 렌더링합니다. 인게임 GUI(GUI 및 GUILayout)에 사용하는 것과 동일한 UnityGUI 클래스를 사용할 수 있습니다. 또한 EditorGUI 및 EditorGUILayout 에디터 전용 클래스에 있는 GUI 컨트롤도 몇 개 더 제공됩니다. 이 클래스는 일반 클래스에 이미 사용 가능한 컨트롤에 추가되므로 원하는 경우 믹스 앤 매치를 할 수 있습니다.
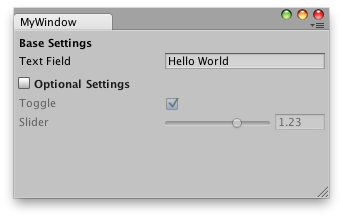
다음 C# 코드는 커스텀 에디터 창에 GUI 요소를 추가하는 방법을 나타냅니다.
using UnityEditor;
using UnityEngine;

public class MyWindow : EditorWindow
{
    string myString = "Hello World";
    bool groupEnabled;
    bool myBool = true;
    float myFloat = 1.23f;

    // Add menu item named "My Window" to the Window menu
    [MenuItem("Window/My Window")]
    public static void ShowWindow()
    {
        //Show existing window instance. If one doesn't exist, make one.
        EditorWindow.GetWindow(typeof(MyWindow));
    }

    void OnGUI()
    {
        GUILayout.Label ("Base Settings", EditorStyles.boldLabel);
        myString = EditorGUILayout.TextField ("Text Field", myString);

        groupEnabled = EditorGUILayout.BeginToggleGroup ("Optional Settings", groupEnabled);
            myBool = EditorGUILayout.Toggle ("Toggle", myBool);
            myFloat = EditorGUILayout.Slider ("Slider", myFloat, -3, 3);
        EditorGUILayout.EndToggleGroup ();
    }
}
위의 예제를 통해 생성된 창은 다음과 같습니다.
자세한 내용은 에디터 창 페이지의 예제와 문서를 참조하십시오.
Did you find this page useful? Please give it a rating:
Thanks for rating this page!
What kind of problem would you like to report?
Thanks for letting us know! This page has been marked for review based on your feedback.
If you have time, you can provide more information to help us fix the problem faster.
Provide more information
You've told us this page needs code samples. If you'd like to help us further, you could provide a code sample, or tell us about what kind of code sample you'd like to see:
You've told us there are code samples on this page which don't work. If you know how to fix it, or have something better we could use instead, please let us know:
You've told us there is information missing from this page. Please tell us more about what's missing:
You've told us there is incorrect information on this page. If you know what we should change to make it correct, please tell us:
You've told us this page has unclear or confusing information. Please tell us more about what you found unclear or confusing, or let us know how we could make it clearer:
You've told us there is a spelling or grammar error on this page. Please tell us what's wrong:
You've told us this page has a problem. Please tell us more about what's wrong:
Thank you for helping to make the Unity documentation better!
Your feedback has been submitted as a ticket for our documentation team to review.
We are not able to reply to every ticket submitted.