マニュアル
- Unity User Manual 2022.1
- Unity 2022.1 の新機能
- パッケージと機能セット
- リリースパッケージ
- 2D Animation
- 2D Pixel Perfect
- 2D PSD Importer
- 2D SpriteShape
- 2D Tilemap Extras
- Adaptive Performance
- Addressables
- Advertisement Legacy
- Advertisement with Mediation
- Alembic
- Analytics
- Analytics Library
- Android Logcat
- Animation Rigging
- Apple ARKit XR Plugin
- AR Foundation
- Authentication
- Burst
- CCD Management
- Cinemachine
- Cloud Build
- Cloud Code
- Cloud Diagnostics
- Cloud Save
- Code Coverage
- Collections
- Device Simulator Devices
- Economy
- Editor Coroutines
- FBX Exporter
- Google ARCore XR Plugin
- In App Purchasing
- Input System
- iOS 14 Advertising Support
- JetBrains Rider Editor
- Live Capture
- Lobby
- Localization
- Magic Leap XR Plugin
- Mathematics
- ML Agents
- Mobile Notifications
- Multiplayer Tools
- Netcode for GameObjects
- Oculus XR Plugin
- OpenXR Plugin
- Polybrush
- Post Processing
- ProBuilder
- Profile Analyzer
- Recorder
- Relay
- Remote Config
- Scriptable Build Pipeline
- Sequences
- Splines
- System Metrics Mali
- Terrain Tools
- Test Framework
- TextMeshPro
- Timeline
- Tutorial Authoring Tools
- Tutorial Framework
- Unity Distribution Portal (UDP)
- Unity Profiling Core API
- Unity Transport
- Version Control
- Visual Scripting
- Visual Studio Code Editor
- Visual Studio Editor
- WebGL Publisher
- XR Interaction Toolkit
- XR Plugin Management
- リリース候補
- プレリリースパッケージ
- コアパッケージ
- ビルトインパッケージ
- AI
- Android JNI
- Animation
- Asset Bundle
- Audio
- Cloth
- Director
- Image Conversion
- IMGUI
- JSONSerialize
- NVIDIA
- Particle System
- Physics
- Physics 2D
- Screen Capture
- Terrain
- Terrain Physics
- Tilemap
- UI
- UIElements
- Umbra
- Unity Analytics
- Unity Web Request
- Unity Web Request Asset Bundle
- Unity Web Request Audio
- Unity Web Request Texture
- Unity Web Request WWW
- Vehicles
- Video
- VR
- Wind
- XR
- 実験的パッケージ
- パッケージをキーワードで探す
- Unity の Package Manager
- カスタムパッケージの作成
- Feature (機能) セット
- リリースパッケージ
- Unity を使用する
- Unity のインストール
- Unity のアップグレード
- API アップデーター
- Upgrade to Unity 2022.1
- Unity 2021 LTS へのアップグレード
- Unity 2020 LTS へのアップグレード
- Unity 2019 LTS へのアップグレード
- Legacy Upgrade Guides
- Unity のインターフェース
- クイックスタートガイド
- ゲームの作成
- エディター機能
- 分析
- Unity のメモリ
- プロファイラー概要
- アプリケーションのプロファイル
- よく使われるプロファイラーマーカー
- Profiler ウィンドウ
- Asset Loading Profiler モジュール
- Audio Profiler モジュール
- CPU Usage Profiler モジュール
- File Access Profiler モジュール
- Global Illumination Profiler モジュール
- GPU Usage Profiler モジュール
- Memory Profiler モジュール
- Physics プロファイラーモジュール
- 2D Physics プロファイラーモジュール
- Rendering Profiler モジュール
- UI Profiler と UI Details Profiler
- Video Profiler モジュール
- Virtual Texturing プロファイラーモジュール
- Profiler のカスタマイズ
- 低レベルのネイティブプラグイン Profiler API
- プロファイリングツール
- ログファイル
- Unity における最適化
- アセットローディングメトリクス
- アセットワークフロー
- 入力
- 2D
- 2D ゲーム開発クイックスタートガイド
- 2D ソート
- スプライト
- Tilemap
- 2D 物理演算リファレンス
- グラフィックス
- レンダーパイプライン
- カメラ
- ライティング
- モデル
- メッシュ
- テクスチャ
- シェーダー
- シェーダーの基礎概念
- ビルトインシェーダー
- Shader Graph の使用
- シェーダーの作成
- シェーダー作成の概要
- ShaderLab
- ShaderLab: シェーダーオブジェクトの定義
- ShaderLab: SubShader の定義
- ShaderLab: パスの定義
- ShaderLab: シェーダープログラムの追加
- ShaderLab: パッケージの要件を指定する
- ShaderLab: コマンド
- ShaderLab: Category ブロックによるコマンドのグループ化
- ShaderLab コマンド: AlphaToMask
- ShaderLab コマンド: Blend
- ShaderLab コマンド: BlendOp
- ShaderLab コマンド: ColorMask
- ShaderLab コマンド: Conservative
- ShaderLab コマンド: Cull
- ShaderLab コマンド: Offset
- ShaderLab コマンド: Stencil
- ShaderLab コマンド: UsePass
- ShaderLab コマンド: GrabPass
- ShaderLab コマンド: ZClip
- ShaderLab コマンド: ZTest
- ShaderLabコマンド: ZWrite
- ShaderLab の古い機能
- Unity での HLSL
- Unity での GLSL
- シェーダーの例
- サーフェスシェーダーの記述
- 様々なグラフィックス API のシェーダーの作成
- Understanding shader performance
- マテリアル
- ビジュアルエフェクト
- Post-processing and full-screen effects
- パーティクルシステム
- パーティクルシステムソリューションの選択
- ビルトインのパーティクルシステム
- ビルトインパーティクルシステムの使用
- パーティクルシステム - 頂点ストリームとスタンダードシェーダーサポート
- パーティクルシステム GPU インスタンス
- パーティクルシステム C# Job System インテグレーション
- コンポーネントとモジュール
- パーティクルシステム
- Particle System モジュール
- メインモジュール
- Emission モジュール
- Shape モジュール
- Velocity Over Lifetime モジュール
- Noise モジュール
- Limit Velocity over Lifetime module
- Inherit Velocity モジュール
- Lifetime by Emitter Speed module
- Force over Lifetime module
- Color over Lifetime module
- Color by Speed module
- Size Over Lifetime モジュール
- Size by Speed モジュール
- Rotation over Lifetime module
- Rotation by Speed module
- External Forces モジュール
- Collision モジュール
- Triggers モジュール
- Sub Emitters モジュール
- Texture Sheet Animation モジュール
- Lights モジュール
- Trails モジュール
- Custom Data モジュール
- Renderer モジュール
- Particle System Force Field
- Visual Effect Graph
- デカールとプロジェクター
- レンズフレアとハロー
- Lines, trails, and billboards
- 空
- 色
- グラフィックス API サポート
- グラフィックスのパフォーマンスとプロファイリング
- 世界観の構築
- 物理演算
- スクリプト
- マルチプレイヤーとネットワーク
- オーディオ
- オーディオの概要
- オーディオファイル
- トラッカーモジュール
- Audio Mixer
- ネイティブオーディオプラグイン SDK
- Audio プロファイラー
- アンビソニックオーディオ
- オーディオリファレンス
- オーディオクリップ
- Audio Listener
- オーディオソース
- Audio Mixer
- Audio Filter
- Audio Effect
- Audio Low Pass Effect
- Audio High Pass Effect
- Audio Echo Effect
- Audio Flange Effect
- Audio Distortion Effect
- Audio Normalize Effect
- Audio Parametric Equalizer Effect
- Audio Pitch Shifter Effect
- Audio Chorus Effect
- Audio Compressor Effect
- Audio SFX Reverb Effect
- Audio Low Pass Simple Effect
- Audio High Pass Simple Effect
- Reverb Zones
- Microphone(マイク)
- Audio Settings
- ビデオの概要
- アニメーション
- Create user interfaces (UI)
- Unity の UI システムの比較
- UI Toolkit
- UI Toolkit について
- UI Builder
- UI の構築
- ビジュアルツリー
- UXML による UI の構築
- C# スクリプトでの UI の構築
- カスタムコントロール
- 要素管理のベストプラクティス
- UXML 要素リファレンス
- UXML 要素 BindableElement
- UXML 要素 VisualElement
- UXML 要素 BoundsField
- UXML 要素 BoundsIntField
- UXML 要素 Box
- UXML 要素 Button
- UXML 要素 ColorField
- UXML 要素 CurveField
- UXML 要素 DoubleField
- UXML 要素 DropdownField
- UXML 要素 EnumField
- UXML 要素 EnumFlagsField
- UXML 要素 FloatField
- UXML 要素 Foldout
- UXML要素 GradientField
- UXML 要素 GroupBox
- UXML 要素 Hash128Field
- UXML 要素 HelpBox
- UXML 要素 IMGUIContainer
- UXML 要素 Image
- UXML 要素 InspectorElement
- UXML 要素 IntegerField
- UXML 要素 Label
- UXML 要素 LayerField
- UXML 要素 LayerMaskField
- UXML 要素 LongField
- UXML 要素 ListView
- UXML 要素 MaskField
- UXML 要素 MinMaxSlider
- UXML 要素 MultiColumnListView
- UXML 要素 MultiColumnTreeView
- UXML 要素 ObjectField
- UXML 要素 PopupWindow
- UXML 要素 ProgressBar
- UXML 要素 PropertyField
- UXML 要素 RadioButton
- UXML 要素 RadioButtonGroup
- UXML 要素 RectField
- UXML 要素 RectIntField
- UXML 要素 RepeatButton
- UXML 要素 ScrollView
- UXML 要素 Scroller
- UXML 要素 Slider
- UXML 要素 SliderInt
- UXML 要素 TagField
- UXML 要素 TextElement
- UXML 要素 TextField
- UXML 要素 Toggle
- UXML 要素 Toolbar
- UXML 要素 ToolbarBreadcrumbs
- UXML 要素 ToolbarButton
- UXML 要素 ToolbarMenu
- UXML 要素 ToolbarPopupSearchField
- UXML 要素 ToolbarSearchField
- UXML 要素 ToolbarSpacer
- UXML 要素 ToolbarToggle
- UXML 要素 TreeView
- UXML 要素 TwoPaneSplitView
- UXML element Vector2Field
- UXML 要素 Vector2IntField
- UXML element Vector3Field
- UXML 要素 Vector3IntField
- UXML 要素 Vector4Field
- UI 構築の例
- UI のスタイル設定
- イベントによる動作の制御
- UI Renderer
- エディター UI のサポート
- ランタイム UI のサポート
- テキストを扱う
- 例
- 移行ガイド
- Unity UI
- IMGUI (即時モードの GUI)
- ナビゲーションと経路探索
- ナビゲーションの概要
- ナビゲーション リファレンス
- ナビゲーションの使いかた
- Unity サービス
- Unity Services のためのプロジェクトの設定
- Unity Organizations
- Unity Ads
- Unity Analytics
- Unity Cloud Build
- Unity Cloud Content Delivery
- Unity IAP
- Unity IAP の設定
- クロスプラットフォームガイド
- ストア ガイド
- ストアの実装
- Unity Cloud Diagnostics
- Unity Integration
- Multiplayer
- Unity Distribution Portal (UDP)
- Unity Accelerator
- XR
- Unity の Asset Store
- プラットフォーム特有の情報
- Unity as a Library を他のアプリケーションで使用
- ディープリンク
- Xcode フレームデバッガーのインテグレーション
- Android
- Android について
- Android 用の開発を始める
- Android 用の開発
- Android モバイルスクリプティング
- Android デバイスの入力
- Android アプリケーションのサイズ制限
- Android のグラフィックス
- テストとデバッグ
- Android のプラグインの作成と利用
- Unity を Android アプリケーションに統合
- Android のディープリンク
- Android のスレッド設定
- デバイスの機能と権限
- Android 用のビルドと提出
- Chrome OS
- iOS
- Linux
- macOS
- tvOS
- WebGL
- Windows
- ユニバーサル Windows プラットフォーム
- Unity Search
- 古いトピック
- 用語集
アセンブリの定義
Assembly Definition (アセンブリ定義) と Assembly Reference (アセンブリ参照) は、スクリプトをアセンブリにまとめるために作成するアセットです。
アセンブリとは C# のコードライブラリで、スクリプトによって定義されたコンパイル済みのクラスや構造体を含み、他のアセンブリへの参照も定義します。C# のアセンブリに関する一般的な情報は、Assemblies in .NET を参照してください。
デフォルトでは、Unity はほとんどすべてのゲームスクリプトを、定義済みの アセンブリ、Assembly-CSharp.dll にコンパイルします。(Unity は、いくつかのより小さな、特殊な定義済みのアセンブリ も作成します。)
この方法は小規模なプロジェクトには適していますが、プロジェクトにさらに多くのコードを追加すると、いくつかの欠点があります。
- 1 つのスクリプトを変更するたびに、Unity は他のすべてのスクリプトを再コンパイルする必要があり、反復的なコード変更を行うと全体のコンパイル時間が長くなります。
- どのスクリプトも他のスクリプトで定義された型に直接アクセスできるため、コードのリファクタリングや改善が難しくなる可能性があります。
- すべてのスクリプトは、すべてのプラットフォーム用にコンパイルされます。
アセンブリを定義することで、コードを整理してモジュール性や再利用性を高めることができます。プロジェクトで定義したアセンブリ内のスクリプトは、デフォルトのアセンブリには加えられず、指定した他のアセンブリのスクリプトにアクセスのみを行います。
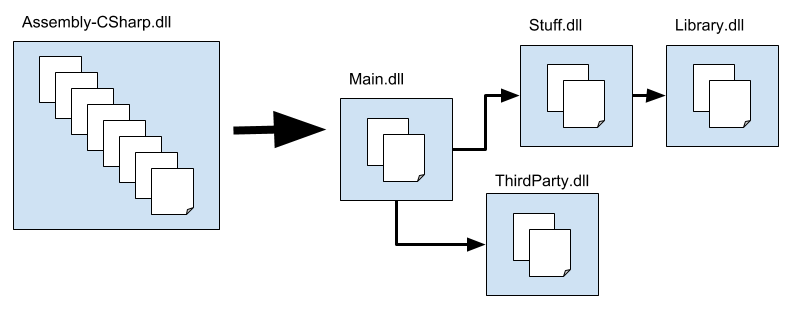
上の図は、プロジェクトのコードを複数のアセンブリに分割する方法を示しています。Main は Stuff を参照しており、その逆ではないため、Main のコードを変更しても Stuff のコードには影響しません。同様に、Library は他のアセンブリに依存していないので、Library のコードを別のプロジェクトでより簡単に再利用することができます。
ここでは、Assembly Definition と Assembly Definition Reference アセットの作成と設定してプロジェクトのアセンブリを定義する方法について説明します。
- アセンブリの定義
- 参照と依存関係
- Assembly Definition アセットの作成
- Assembly Definition References アセットの作成
- プラットフォーム固有のアセンブリの作成
- エディターコード用のアセンブリの作成
- テストアセンブリの作成
- 他のアセンブリの参照
- プリコンパイルされたプラグインアセンブリの参照
- 条件付きで組み立てるアセンブリ
- プロジェクトパッケージに基づくシンボルの定義
- スクリプトがどのアセンブリに属しているかを見つける
- 特殊なフォルダー
- ビルドスクリプトのアセンブリ情報の取得
関連項目
アセンブリの定義
プロジェクトのコードをアセンブリに整理するには、必要なアセンブリごとにフォルダーを作成し、各アセンブリに属するスクリプトを該当するフォルダーに移動します。その後、Assembly Definition アセットを作成 してアセンブリのプロパティを指定します。
Unity は、Assembly Definition アセットを含むフォルダーのすべてのスクリプトを取得し、アセットで定義された名前やその他の設定を使用してアセンブリにコンパイルします。子フォルダーに独自の Assembly Definition か Assembly Reference アセットがない限り、同じアセンブリ内のすべての子フォルダーにあるスクリプトも含まれます。
既存のアセンブリに子ではないフォルダーのスクリプトを含むには、子ではないフォルダーに Assembly Reference アセットを作成し、ターゲットのアセンブリを定義する Assembly Definition アセットを参照するように設定します。例えば、エディターフォルダーがどこにあるかにかかわらず、プロジェクト内のすべてのエディターフォルダーのスクリプトを独自のアセンブリにまとめることができます。
Unity はアセンブリの依存関係に基づいてアセンブリのコンパイルを行います。コンパイルの順番を指定することはできません。
参照と依存関係
- ある型 (クラスや構造体など) が他の型を使用する場合、最初の型は 2 番目の型に 依存 しています。Unity がスクリプトをコンパイルする場合、そのスクリプトが依存している型やその他のコードにもアクセスできなければなりません。同様に、コンパイルされたコードが実行される場合、その依存関係のコンパイルされたバージョンにアクセスできなければなりません。2 つの型が異なるアセンブリにある場合、依存する型を含むアセンブリは、依存する型を含むアセンブリへの 参照 を宣言しなければなりません。
プロジェクトで使用されるアセンブリ間の参照は、Assembly Definition オプションを使用して制御できます。Assembly Definition の設定には以下があります。
- Auto Referenced – 定義済みのアセンブリがアセンブリを参照するかどうか。
- Assembly Definition References – Assembly Definition で作成された他のプロジェクトのアセンブリへの参照
- Override References + Assembly References – プリコンパイルされた (プラグイン) アセンブリへの参照
- No Engine References – UnityEngine のアセンブリへの参照
ノート: Assembly Definition で作成されたアセンブリのクラスは、定義済みのアセンブリで定義された型を使用できません。
デフォルト参照
デフォルトでは、定義済みのアセンブリは、Assembly Definition で作成されたアセンブリ (1) や、プラグインとしてプロジェクトに加えられたプリコンパイルされたアセンブリ (2) など、他のすべてのアセンブリを参照します。また、Assembly Definition アセットで作成したアセンブリは、自動的にすべてのプリコンパイルされたアセンブリを参照します (3)。
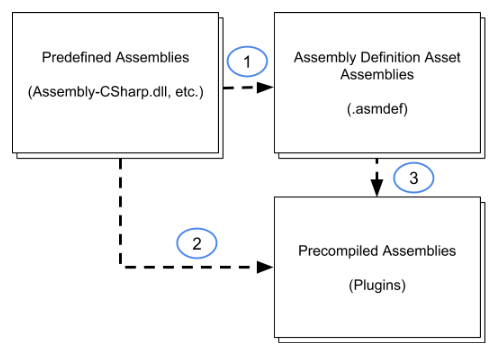
デフォルトの設定では、定義済みのアセンブリのクラスは、プロジェクトの他のアセンブリで定義されたすべての型を使用できます。同様に、Assembly Definition アセットを使用して作成したアセンブリは、プリコンパイルされた (プラグイン) アセンブリで定義されたすべての型を使用できます。
Assembly Definition アセットの Inspector で [Auto Referenced オプション] をオフにすることで、定義済みアセンブリからアセンブリが参照されないようにすることができます。Auto Referenced (自動参照) をオフにすると、アセンブリのコードを変更したときに定義済みアセンブリが再コンパイルされなくなります。しかし、定義済みアセンブリがこのアセンブリのコードを直接使用できなくなるということも意味します。詳しくは、[Assembly Definition プロパティ] を参照してください。
同様に、プラグインアセットの Plugin Inspector の Auto Referenced プロパティ をオフにすると、プラグインアセンブリが自動的に参照されないようにすることができます。これは、定義済みのアセンブリと、Assembly Definition を使って作成したアセンブリの両方に影響します。詳細は、Plugin Inspector を参照してください。
プラグイン の Auto Referenced をオフにすると、Assembly Definition アセットの Inspector で明示的に参照できるようになります。アセットの Override References オプションを有効にして、プラグイン への参照を加えます。Assembly Definition プロパティを参照してください。
ノート: プリコンパイルされたアセンブリに対して、明示的な参照を宣言することはできません。定義済みのアセンブリは、自動参照されたアセンブリのコードのみを使用できます。
循環的な参照
アセンブリの循環的な参照は、あるアセンブリが 2 つ目のアセンブリを参照し、さらにその 2 つ目のアセンブリが最初のアセンブリを参照する場合に存在します。このようなアセンブリ間の循環的な参照は許可されておらず、“Assembly with cyclic references detected” (循環的な参照を持つアセンブリが検知されました) というメッセージでエラーとして報告されます。
通常、このようなアセンブリ間の循環的な参照は、アセンブリで定義されたクラス内の循環的な参照が理由で発生します。同じアセンブリのクラス間の循環参照は技術的には問題ありませんが、異なるアセンブリのクラス間の循環参照は許可されません。循環参照エラーが発生した場合は、循環参照を削除するか、相互に参照しているクラスを同じアセンブリ内に置くようにコードをリファクタリングする必要があります。
Assembly Definition アセットの作成
Assembly Definition アセットを作成するには以下を行います。
- Project ウィンドウで、アセンブリに加えるスクリプトを持つフォルダーを探します。
- フォルダーに Assembly Definition アセットを作成します (メニュー: Assets > Create > Assembly Definition)。
- アセットに名前を割り当てます。デフォルトでは、アセンブリファイルにはアセットに割り当てた名前が使用されますが、Inspector ウィンドウで名前を変更することができます。
Unity はプロジェクト内のスクリプトを再コンパイルして、新しいアセンブリを作成します。終了すると、新しい Assembly Definition の設定を変更することができます。
Assembly Definition を含むフォルダー内のスクリプトは、子フォルダー内のスクリプトも含め (子フォルダーに独自の Assembly Definition または Assembly Reference アセットが含まれている場合を除く)、新しいアセンブリにコンパイルされ、以前のアセンブリから削除されます。
Assembly Definition Reference アセットの作成
Assembly Definition Reference を作成します。
Project ウィンドウで、参照されるアセンブリに加えるスクリプトを含むフォルダーを探します。
フォルダーに Assembly Referenceアセットを作成します (メニュー:Assets > Create > Assembly Definition Reference)。
-
アセットに名前を付けます。
Unity はプロジェクト内のスクリプトを再コンパイルして、新しいアセンブリを作成します。終了すると、新しい Assembly Definition Reference の設定を変更することができます。
-
新しい Assembly Definition Reference アセットを選択して、そのプロパティを Inspector で表示します。

Assembly Definition プロパティを設定して、対象の Assembly Definition アセットを参照します。
クリック Apply。
Assembly Definition Reference アセットを含むフォルダーのスクリプトは、子フォルダー内のスクリプトも含め (子フォルダーに独自の Assembly Definition または Assembly Definition Reference アセットが含まれている場合を除く)、参照されるアセンブリにコンパイルされ、以前のアセンブリから削除されます。
プラットフォーム固有のアセンブリの作成
特定のプラットフォーム用のアセンブリを作成するには、以下を行います。
-
新しい Assembly Definition Reference アセットを選択して、そのプロパティを Inspector で表示します。
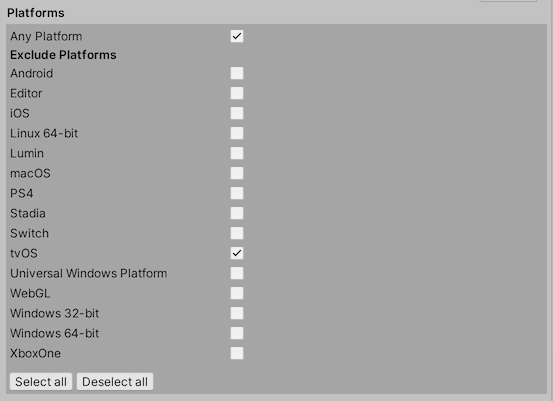
Any Platform オプションをチェックし、除外する特定のプラットフォームを選択します。または、Any Platform のチェックを外し、対象とする特定のプラットフォームを選択することもできます。
Apply をクリックします。
アセンブリは、プラットフォーム用にプロジェクトをビルドする際に、選択されたプラットフォームに応じて含まれます (または除外されます)。
エディターコード用アセンブリの作成
エディターアセンブリによって、エディタースクリプトを Editor という名のトップレベルのフォルダーだけではなく、プロジェクトのどこにでも置くことができます。
エディターコードを含むアセンブリをプロジェクトに作成するには、以下を行います。
- プラットフォーム専用のアセンブリ をエディタースクリプトが含まれるフォルダーに作成してください。
- エディタープラットフォームのみを含めます。
- エディターのスクリプトが入っているフォルダーが他にもある場合は、それらのフォルダーに Assembly Definition Reference アセットを作成 し、このアセンブリ定義を参照するように設定します。
テストアセンブリの作成
テストアセンブリを使うと、Unity TestRunner でテストを書いて実行することができ、テストコードをアプリケーションと一緒に出荷するコードから別にしておくことができます。Unity は TestRunner を Test Framework パッケージ の一部として提供しています。Test Framework パッケージのインストールやテストアセンブリの作成方法については、Test Framework ドキュメント を参照してください。
別のアセンブリの参照
別のアセンブリに含まれる C# の型や関数を使用するには、Assembly Definition アセットでそのアセンブリへの参照を作成する必要があります。
アセンブリ参照を作成するには以下を行います。
参照を必要とするアセンブリの Assembly Definition を選択して、そのプロパティを Inspector で表示します。
-
Assembly Definition References セクションで、+ ボタンをクリックして、新しい参照を追加します。

参照リストの中で新しく作成されたスロットに Assembly Definition アセットを割り当てます。
Use GUIDs オプションを有効にすると、新しい名前を反映するように他の Assembly Definition の参照を更新することなく、参照されている Assembly Definition アセットのファイル名を変更できます。(アセットファイルのメタデータファイルが削除された場合や、メタデータファイルをいっしょに移動せずにファイルを Unity エディターの外に移動させた場合は、GUID をリセットする必要があります)。
プリコンパイルされたプラグインアセンブリの参照
デフォルトでは、Assembly Definition を使用して作成されたプロジェクトのすべてのアセンブリは、すべてのプリコンパイルされたアセンブリを自動的に参照します。この自動参照は、アセンブリ内のコードが使用されていなくても、プリコンパイルされたアセンブリのいずれかを更新すると、すべてのアセンブリを再コンパイルする必要があります。この余分なオーバーヘッドを避けるために、自動参照をオーバーライドして、アセンブリが実際に使用するプリコンパイル済みライブラリのみを参照するよう指定します。
参照を必要とするアセンブリの Assembly Definition を選択して、そのプロパティを Inspector で表示します。
-
General セクションで、Override References オプションを有効にします。

Inspector の Assembly References セクションは、Override References がチェックされていると利用可能になります。
Assembly References セクションで、+ ボタンをクリックして、新しい参照を加えます。
-
空きスロットのドロップダウンリストを使って、プリコンパイルされたアセンブリへの参照を割り当てます。リストには、プロジェクトの Build Settings で現在設定されているプラットフォーム用のプロジェクトのすべてのプリコンパイルされたアセンブリが表示されます。(プリコンパイルされたアセンブリのプラットフォーム互換性は、Plugin Inspector で設定してください)。
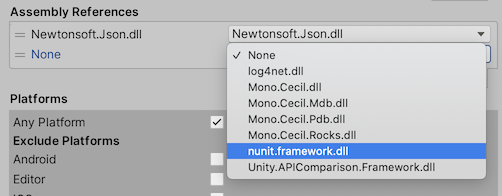
Apply をクリックします。
プロジェクトをビルドする各プラットフォームで繰り返します。
条件付きでアセンブリを加える
プリプロセッサシンボルを使って、ゲームやアプリケーションのビルド (エディターの再生モードを含む) にアセンブリをコンパイルして加えるかどうかを制御することができます。Assembly Definition オプションの Define Constraints リストで、アセンブリを使用するために定義しなければならないシンボルを指定することができます。
Assembly Definition を選択すると、そのプロパティが Inspector に表示されます。
-
Define Constraints セクションで、+ ボタンをクリックすると、制約のリストに新しいシンボルが追加されます。

-
シンボル名を入力します。
名前の前に感嘆符を付けることで、シンボルを否定することができます。例えば、
!UNITY_WEBGLという制約は、UNITY_WEBGL が定義されていない場合、アセンブリを含むことになります。 Apply をクリックします。
以下の記号を制約条件として使用できます。
- Scripting Define Symbols 設定 (Project Settings の中の Player セクションにあります) で定義されたシンボル。 Scripting Define Symbols は、プロジェクトの Build Settings で現在設定されているプラットフォームに適用されます。複数のプラットフォーム用にシンボルを定義するには、それぞれのプラットフォームに切り替えて Scripting Define Symbols フィールドを個別に変更する必要があります。
- Unity で定義されているシンボル。プラットフォーム依存のコンパイル を参照してください。
- Assembly Definition アセットの Version Defines セクションで定義されたシンボル。
スクリプトで定義されたシンボルは、定義する際に制約が満たされているかどうかを考慮しません。
詳細は 制約の定義 を参照してください。
Defining symbols based on Unity and project package versions
If you need to compile different code in an assembly according to whether a project uses specific versions of Unity or of a package, you can add entries to the Version Defines list. This list specifies rules for when a symbol should be defined. For version numbers, you can specify a logical expression that evaluates to a specific version or a range of versions.
シンボルを条件付きで定義するには、以下のようにします。
Select the Assembly Definition asset for the assembly to view its properties in the Inspector.
Version Defines セクションで、 + ボタンをクリックしてリストに新しいシンボルを加えます。
-
プロパティを設定します。
- Resource: choose Unity or the package or module that must be installed in order for this symbol to be defined
- Define: シンボル名
- Expression: 特定のバージョンまたはバージョンの範囲を評価する式。ルールに関しては バージョン定義式 を参照してください。
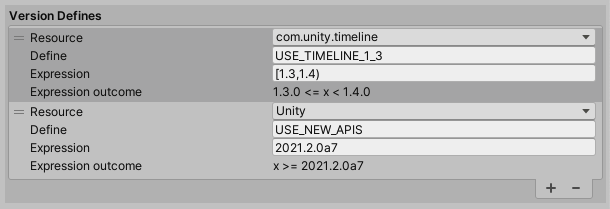
The Expression outcome shows which versions the expression evaluates to. If the outcome displays, Invalid, then expression syntax is incorrect.
The following example defines the symbol, USE_TIMELINE_1_3, if the project uses Timeline 1.3 and defines, USE_NEW_APIS, if the project is opened in Unity 2021.2.0a7, or later:
Apply をクリックします。
Assembly Definition で定義されたシンボルは、その定義のために作成されたアセンブリ内のスクリプトに対してのみ適用されます。
Note that you can use the symbols defined using the Version Defines list as Define Constraints. Thus you could specify that an assembly should only be used when specific versions of a given package are also installed in the project.
Version Define expressions
You can use expressions to specify an exact version or a range of versions. A Version Define expression uses mathematical range notation.
A square bracket, “[]” designates that the range includes the endpoint:
[1.3,3.4.1]は1.3.0 <= x <= 3.4.1を評価します。
かっこ () は、終点を除いた範囲であることを示します。
(1.3.0,3.4)は1.3.0 < x < 3.4.0を評価します。
1 つの式の中で、両方の範囲タイプを混在させることができます。
[1.1,3.4)は1.1.0 <= x < 3.4.0を評価します。
(0.2.4,5.6.2-preview.2]は0.2.4 < x <= 5.6.2.-preview.2を評価します。
正確なバージョンを指定するには、角かっこに単一のバージョン指定子を示します。
[2.4.5]はx = 2.4.5を評価します。
ショートカットとして、範囲かっこを付けずに単一のバージョンを入力すると、その式はそのバージョン以降を含むことを示します。
2.1.0-preview.7はx >= 2.1.0-preview.7を評価します。
Note: No spaces are allowed in an expression. No wildcard characters are supported.
Unity version numbers
Current versions of Unity (and all versions that support Assembly Definitions) use a version designator with three parts: MAJOR.MINOR.REVISION, for example, 2017.4.25f1, 2018.4.29f1, and 2019.4.7f1.
- The MAJOR version is the target release year, such as 2017 or 2021.
- The MINOR version is the target release quarter, such as 1, 2, 3, or 4.
- The REVISION designator has three parts of its own, with the format: RRzNN, where:
- RR is a one or two digit revision number
- z is a letter designating the release type:
- a = alpha release
- b = beta release
- f = a normal public release
- c = China release version (equivalent to f)
- p = patch release
- x = experimental release
- NN is one or two digit incremental number
Release type designators are compared as follows:
a < b < f = c < p < x
In other words, an alpha release is considered earlier than a beta, which is earlier than a normal (f) or China (c) release. A patch release is always later than a normal or China release with the same revision number and an experimental release is later than any other release type. Note that experimental releases do not use an incremental number at the end.
Unity version numbers are allowed to have a suffix after the REVISION component, such as 2019.3.0f11-Sunflower. Any suffixes are ignored for the purpose of comparing versions.
As an example, the following expression includes any 2017 or 2018 version of Unity, but not any version in 2019 or later:
[2017,2019)
Package and module version numbers
Package and module version designators have four parts, following the Semantic Versioning format: MAJOR.MINOR.PATCH-LABEL. The first three parts are always numbers, but the label is a string. Unity packages in preview use the string, preview or preview.n, where n > 0.
See Package Versioning for more information about package version numbers.
For example, the following expression includes all versions of a package with MAJOR.MINOR versions between 3.2 and 6.1 (inclusive):
[3.2,6.1]
スクリプトがどのアセンブリに属しているかを調べる
C# スクリプトがどのアセンブリにコンパイルされているかを確認するには、以下の方法があります。
Unity Project ウィンドウで C# スクリプトファイルを選択すると、Inspector ウィンドウにそのプロパティが表示されます。
-
アセンブリのファイル名とAssembly Definition (存在する場合) は、Inspector の Assembly Information セクションに表示されます。
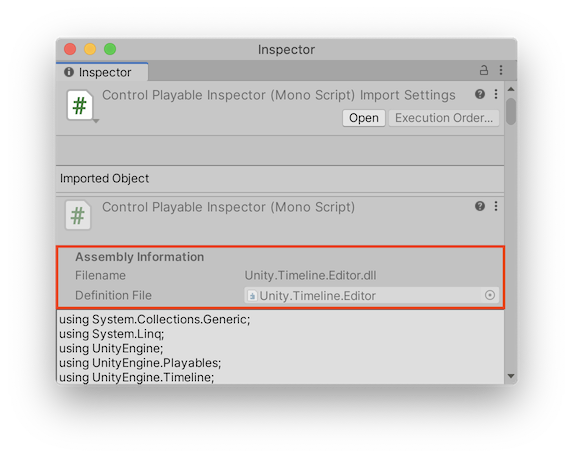
この例では、選択されたスクリプトは、Unity.Timeline.Editor の Assembly Definition アセットによって定義されたライブラリファイル Unity.Timeline.Editor.dll にコンパイルされます。
特殊フォルダー
Unity では、ある特別な名前を持つフォルダー内のスクリプトは、他のフォルダー内のスクリプトとは異なる扱いになります。ただし、そのフォルダー内やその上のフォルダーに Assembly Definition アセットを作成すると、特別な扱いを受けなくなります。この変化は、Editor フォルダーを使用しているときに気づくかもしれません。Editor フォルダーは、プロジェクトあちこちにある可能性があります (コードの整理方法や、使用している Asset Store パッケージ によって異なります)。
Unity では通常、Editor という名前のフォルダーにあるスクリプトは、どこにあっても定義済みの Assembly-CSharp-Editor アセンブリにコンパイルされます。ただし、その下に Editor フォルダーがあるフォルダーに Assembly Definition アセットを作成すると、Unity はそれらの Editor スクリプトを定義済みの Editor アセンブリに入れることはなくなります。その代わりに、Assembly Definition で作成された新しいアセンブリに加えられますが、そこは本来の場所ではない場合があります。Editor フォルダーを管理するには、各 Editor フォルダーに Assembly Definition または Assembly Definition Reference アセットを作成して、それらのスクリプトを 1 つまたは複数の Editor アセンブリに配置します。エディターコード用のアセンブリの作成 を参照してください。
アセンブリ属性の設定
アセンブリ属性を使用して、アセンブリのメタデータプロパティを設定できます。慣習的に、アセンブリ属性ステートメントは AssemblyInfo.cs という名前のファイルに記述します。
例えば、以下のアセンブリ属性は、いくつかの .NET アセンブリメタデータ値、テストに役立つ InternalsVisibleTo 属性、プロジェクトをビルドする際に未使用のコードをアセンブリから削除する方法に影響する Unity 定義の Preserve 属性 を指定します。
[assembly: System.Reflection.AssemblyCompany("Bee Corp.")]
[assembly: System.Reflection.AssemblyTitle("Bee's Assembly")]
[assembly: System.Reflection.AssemblyCopyright("Copyright 2020.")]
[assembly: System.Runtime.CompilerServices.InternalsVisibleTo("UnitTestAssembly")]
[assembly: UnityEngine.Scripting.Preserve]
ビルドスクリプトでアセンブリ情報を取得
UnityEditor.Compilation 名前空間にある CompilationPipeline クラスを使用して、Unity がプロジェクトのためにビルドしたすべてのアセンブリ (Assembly Definition アセットに基づいて作成されたものを含む) に関する情報を取得できます。
例えば、次のスクリプトは、CompilationPipeline クラスを使用して、プロジェクトの現在の Player アセンブリをすべて列挙します。
using UnityEditor;
using UnityEditor.Compilation;
public static class AssemblyLister
{
    [MenuItem("Tools/List Player Assemblies in Console")]
    public static void PrintAssemblyNames()
    {
        UnityEngine.Debug.Log("== Player Assemblies ==");
        Assembly[] playerAssemblies =
            CompilationPipeline.GetAssemblies(AssembliesType.Player);

        foreach (var assembly in playerAssemblies)
        {
            UnityEngine.Debug.Log(assembly.name);
        }
    }
}
Did you find this page useful? Please give it a rating:
Thanks for rating this page!
What kind of problem would you like to report?
Thanks for letting us know! This page has been marked for review based on your feedback.
If you have time, you can provide more information to help us fix the problem faster.
Provide more information
You've told us this page needs code samples. If you'd like to help us further, you could provide a code sample, or tell us about what kind of code sample you'd like to see:
You've told us there are code samples on this page which don't work. If you know how to fix it, or have something better we could use instead, please let us know:
You've told us there is information missing from this page. Please tell us more about what's missing:
You've told us there is incorrect information on this page. If you know what we should change to make it correct, please tell us:
You've told us this page has unclear or confusing information. Please tell us more about what you found unclear or confusing, or let us know how we could make it clearer:
You've told us there is a spelling or grammar error on this page. Please tell us what's wrong:
You've told us this page has a problem. Please tell us more about what's wrong:
Thank you for helping to make the Unity documentation better!
Your feedback has been submitted as a ticket for our documentation team to review.
We are not able to reply to every ticket submitted.