マニュアル
- Unity ユーザーマニュアル 2021.3 (LTS)
- New in Unity 2021 LTS
- パッケージと機能セット
- リリースパッケージ
- 2D Animation
- 2D Pixel Perfect
- 2D PSD Importer
- 2D SpriteShape
- 2D Tilemap Extras
- Adaptive Performance
- Addressables
- Advertisement
- Alembic
- Analytics
- Analytics Library
- Android Logcat
- Animation Rigging
- AR Foundation
- ARCore XR Plugin
- ARKit Face Tracking
- ARKit XR Plugin
- Authentication
- Burst
- Cinemachine
- Cloud Code
- Cloud Save
- Code Coverage
- Collections
- Economy
- Editor Coroutines
- FBX Exporter
- In App Purchasing
- Input System
- iOS 14 Advertising Support
- JetBrains Rider Editor
- Live Capture
- Lobby
- Localization
- Magic Leap XR Plugin
- Mathematics
- ML Agents
- Mobile Notifications
- Oculus XR Plugin
- OpenXR Plugin
- Polybrush
- Post Processing
- ProBuilder
- Profile Analyzer
- レコーダー
- Relay
- Remote Config
- Scriptable Build Pipeline
- Sequences
- Terrain Tools
- Test Framework
- TextMeshPro
- Timeline
- Tutorial Authoring Tools
- Tutorial Framework
- Unity Distribution Portal (UDP)
- Unity Profiling Core API
- Unity Transport
- Version Control
- Visual Scripting
- Visual Studio Code Editor
- Visual Studio Editor
- WebGL Publisher
- XR Plugin Management
- リリース候補
- プレリリースパッケージ
- コアパッケージ
- ビルトインパッケージ
- AI
- Android JNI
- アニメーション
- Asset Bundle
- Audio
- Cloth
- Director
- Image Conversion
- IMGUI
- JSONSerialize
- NVIDIA
- Particle System
- Physics
- Physics 2D
- Screen Capture
- Terrain
- Terrain Physics
- Tilemap
- UI
- UIElements
- Umbra
- Unity Analytics
- Unity Web Request
- Unity Web Request Asset Bundle
- Unity Web Request Audio
- Unity Web Request Texture
- Unity Web Request WWW
- Vehicles
- Video
- VR
- Wind
- XR
- 実験的パッケージ
- パッケージをキーワードで探す
- Unity の Package Manager
- カスタムパッケージの作成
- Feature (機能) セット
- リリースパッケージ
- Unity を使用する
- Unity のインストール
- Unity のアップグレード
- API アップデーター
- Unity 2021 LTS へのアップグレード
- Unity 2020 LTS へのアップグレード
- Unity 2019 LTS へのアップグレード
- Legacy Upgrade Guides
- Unity のインターフェース
- クイックスタートガイド
- ゲームの作成
- エディター機能
- 分析
- Unity のメモリ
- プロファイラー概要
- アプリケーションのプロファイル
- よく使われるプロファイラーマーカー
- Profiler ウィンドウ
- Asset Loading Profiler モジュール
- Audio Profiler モジュール
- CPU Usage Profiler モジュール
- File Access Profiler モジュール
- Global Illumination Profiler モジュール
- GPU Usage Profiler モジュール
- Memory Profiler モジュール
- Physics プロファイラーモジュール
- 2D Physics プロファイラーモジュール
- Rendering Profiler モジュール
- UI Profiler と UI Details Profiler
- Video Profiler モジュール
- Virtual Texturing プロファイラーモジュール
- Profiler のカスタマイズ
- 低レベルのネイティブプラグイン Profiler API
- プロファイリングツール
- ログファイル
- Unity における最適化
- アセットローディングメトリクス
- アセットワークフロー
- 入力
- 2D
- 2D ゲーム開発クイックスタートガイド
- 2D ソート
- スプライト
- Tilemap
- 2D 物理演算リファレンス
- グラフィックス
- レンダーパイプライン
- カメラ
- ライティング
- モデル
- メッシュ
- テクスチャ
- シェーダー
- シェーダーの基礎概念
- ビルトインシェーダー
- Shader Graph の使用
- シェーダーの作成
- シェーダー作成の概要
- ShaderLab
- ShaderLab: シェーダーオブジェクトの定義
- ShaderLab: SubShader の定義
- ShaderLab: パスの定義
- ShaderLab: シェーダープログラムの追加
- ShaderLab: パッケージの要件を指定する
- ShaderLab: コマンド
- ShaderLab: Category ブロックによるコマンドのグループ化
- ShaderLab コマンド: AlphaToMask
- ShaderLab コマンド: Blend
- ShaderLab コマンド: BlendOp
- ShaderLab コマンド: ColorMask
- ShaderLab コマンド: Conservative
- ShaderLab コマンド: Cull
- ShaderLab コマンド: Offset
- ShaderLab コマンド: Stencil
- ShaderLab コマンド: UsePass
- ShaderLab コマンド: GrabPass
- ShaderLab コマンド: ZClip
- ShaderLab コマンド: ZTest
- ShaderLabコマンド: ZWrite
- ShaderLab の古い機能
- Unity での HLSL
- Unity での GLSL
- シェーダーの例
- サーフェスシェーダーの記述
- 様々なグラフィックス API のシェーダーの作成
- シェーダーのパフォーマンスについての理解
- マテリアル
- ビジュアルエフェクト
- ポストプロセス、フルスクリーンエフェクト
- パーティクルシステム
- パーティクルシステムソリューションの選択
- ビルトインのパーティクルシステム
- ビルトインパーティクルシステムの使用
- パーティクルシステム - 頂点ストリームとスタンダードシェーダーサポート
- パーティクルシステム GPU インスタンス
- パーティクルシステム C# Job System インテグレーション
- コンポーネントとモジュール
- パーティクルシステム
- Particle System モジュール
- メインモジュール
- Emission モジュール
- Shape モジュール
- Velocity over Lifetime モジュール
- Noise モジュール
- Limit Velocity over Lifetime モジュール
- Inherit Velocity モジュール
- Lifetime by Emitter Speed モジュール
- Force over Lifetime モジュール
- Color Over Lifetime モジュール
- Color By Speed モジュール
- Size over Lifetime モジュール
- Size by Speed モジュール
- Rotation over Lifetime モジュール
- Rotation by Speed モジュール
- External Forces モジュール
- Collision モジュール
- Triggers モジュール
- Sub Emitters モジュール
- Texture Sheet Animation モジュール
- Lights モジュール
- Trails モジュール
- Custom Data モジュール
- Renderer モジュール
- Particle System Force Field
- Visual Effect Graph
- デカールとプロジェクター
- レンズフレアとハロー
- ライン、トレイル、ビルボード
- 空
- 色
- グラフィックス API サポート
- グラフィックスのパフォーマンスとプロファイリング
- 世界観の構築
- 物理演算
- スクリプト
- マルチプレイヤーとネットワーク
- オーディオ
- ビデオの概要
- アニメーション
- Create user interfaces (UI)
- Unity の UI システムの比較
- UI Toolkit
- UI Toolkit について
- ビジュアルツリー
- レイアウトエンジン
- UI Builder
- UXML による UI の構築
- Write UXML Templates
- Load UXML from C# scripts
- UXML 要素のリファレンス
- UXML 要素 BindableElement
- UXML 要素 BoundsField
- UXML 要素 BoundsIntField
- UXML 要素 Box
- UXML 要素 Button
- UXML 要素 ColorField
- UXML 要素 CurveField
- UXML 要素 DoubleField
- UXML 要素 DropdownField
- UXML 要素 EnumField
- UXML 要素 EnumFlagsField
- UXML 要素 FloatField
- UXML 要素 Foldout
- UXML要素 GradientField
- UXML 要素 GroupBox
- UXML 要素 Hash128Field
- UXML 要素 HelpBox
- UXML 要素 IMGUIContainer
- UXML 要素 Image
- UXML 要素 InspectorElement
- UXML 要素 IntegerField
- UXML 要素 Label
- UXML 要素 LayerField
- UXML 要素 LayerMaskField
- UXML 要素 LongField
- UXML 要素 ListView
- UXML 要素 MaskField
- UXML 要素 MinMaxSlider
- UXML 要素 ObjectField
- UXML 要素 PopupWindow
- UXML 要素 ProgressBar
- UXML 要素 PropertyField
- UXML 要素 RadioButton
- UXML 要素 RadioButtonGroup
- UXML 要素 RectField
- UXML 要素 RectIntField
- UXML 要素 RepeatButton
- UXML 要素 ScrollView
- UXML 要素 Scroller
- UXML 要素 Slider
- UXML 要素 SliderInt
- UXML 要素 TagField
- UXML 要素 TextElement
- UXML 要素 TextField
- UXML 要素 Toggle
- UXML 要素 Toolbar
- UXML 要素 ToolbarBreadcrumbs
- UXML 要素 ToolbarButton
- UXML 要素 ToolbarMenu
- UXML 要素 ToolbarPopupSearchField
- UXML 要素 ToolbarSearchField
- UXML 要素 ToolbarSpacer
- UXML 要素 ToolbarToggle
- UXML 要素 TreeView
- UXML 要素 TwoPaneSplitView
- UXML 要素 Vector2Field
- UXML 要素 Vector2IntField
- UXML 要素 Vector3Field
- UXML 要素 Vector3IntField
- UXML 要素 Vector4Field
- UXML 要素 VisualElement
- UQuery
- Style UI with USS
- イベントによる動作の制御
- コントロール
- SerializedObject のデータバインディング
- ViewData の永続性
- Manage UI asset references from C# scripts
- 例
- 移行ガイド
- Unity UI
- IMGUI (即時モードの GUI)
- ナビゲーションと経路探索
- ナビゲーションの概要
- ナビゲーション リファレンス
- ナビゲーションの使いかた
- Unity Services
- Unity Services のためのプロジェクトの設定
- Unity Organizations
- Unity Ads
- Legacy Analytics
- Legacy Analytics Overview
- Setting Up Legacy Analytics
- Legacy Analytics Dashboard
- Legacy Analytics Events
- ファネル
- Remote Settings
- Unity Analytics A/B テスト
- マネタイゼーション
- ユーザー属性
- Unity Analytics Raw Data Export
- データリセット
- Unity Analytics のアップグレード
- 児童オンラインプライバシー保護法 (COPPA) コンプライアンス
- Unity Analytics と EU の一般データ保護規則 (GDPR)
- Unity Analytics and PIPL
- Analytics 指標、セグメント、用語
- Unity Cloud Build
- Unity Cloud Content Delivery
- Unity IAP
- Unity IAP の設定
- クロスプラットフォームガイド
- ストア ガイド
- ストアの実装
- Unity Cloud Diagnostics
- Unity Integration
- Multiplayer
- Unity Distribution Portal (UDP)
- Unity Accelerator
- XR
- オープンソースリポジトリ
- Unity の Asset Store
- プラットフォーム特有の情報
- Unity as a Library を他のアプリケーションで使用
- ディープリンク
- Xcode フレームデバッガーのインテグレーション
- Android
- Android について
- Android 用の開発を始める
- Android 用の開発
- Android モバイルスクリプティング
- Android デバイスの入力
- Android アプリケーションのサイズ制限
- Android のグラフィックス
- テストとデバッグ
- Android のプラグインの作成と利用
- Unity を Android アプリケーションに統合
- Android のディープリンク
- Android のスレッド設定
- デバイスの機能と権限
- Android 用のビルドと提出
- Chrome OS
- iOS
- Linux
- macOS
- tvOS
- WebGL
- Windows
- ユニバーサル Windows プラットフォーム
- Getting Started
- Universal Windows Platform: Deployment
- Universal Windows Platform (UWP) build settings
- Windows Device Portal Deployment
- Universal Windows Platform: Profiler
- Universal Windows Platform: Command line arguments
- Universal Windows Platform: Association launching
- AppCallbacks class
- Universal Windows Platform: WinRT API in C# scripts
- ユニバーサル Windows プラットフォームの Player 設定
- Deep linking on Universal Windows Platform
- Universal Windows Platform: IL2CPP scripting back end
- FAQ
- Universal Windows Platform: Examples
- Universal Windows Platform: Code snippets
- Known issues
- Unity Search
- 古いトピック
- 用語集
- Unity ユーザーマニュアル 2021.3 (LTS)
- Create user interfaces (UI)
- UI Toolkit
- 移行ガイド
- Migrate from Unity UI (UGUI) to UI Toolkit
Migrate from Unity UI (UGUI) to UI Toolkit
This page guides developers with experience in Unity UI (UGUI) to transition to the new UI Toolkit system. It explores the similarities and differences between UGUI and the UI Toolkit.
As UGUI is a runtime-only UI system, this page focuses on runtime UI. UI Toolkit can create both runtime and Editor UI. This guide applies to both use cases for UI Toolkit.
UIヒエラルキー
Both UGUI and UI Toolkit build and maintain the UI inside a hierarchy tree structure. In UGUI, all elements in this hierarchy are visible as individual GameObjects in the hierarchy view panel. In UI Toolkit, visual elements organize into a Visual Tree. The Visual Tree isn’t visible in the panel.
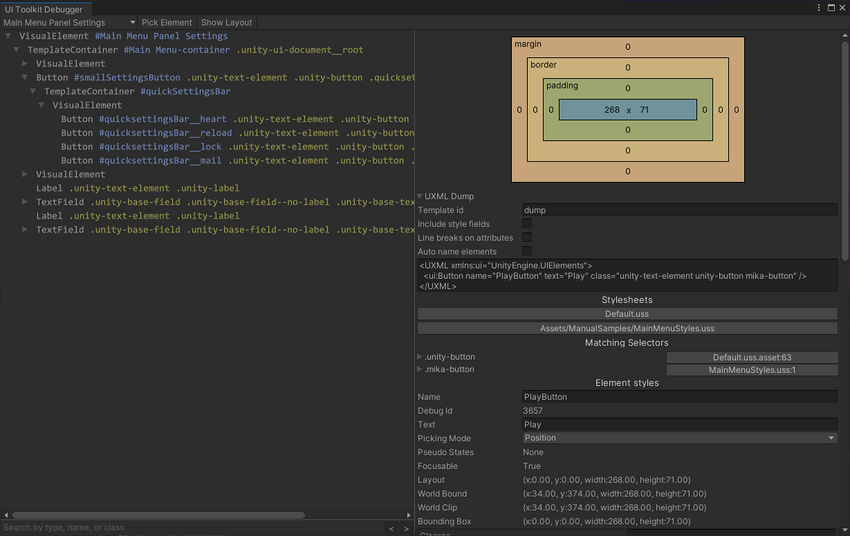
UI Toolkit での UI 階層の表示とデバッグは、UI デバッガーを使用して行えます。UI デバッガーは、エディターツールバーの Window > UI Toolkit > Debugger の下にあります。

主な相違点
Canvas と UIDocument
The Canvas component in UGUI is similar to the UIDocument component in UI Toolkit. Both are MonoBehaviours that attach to GameObjects.
In UGUI, a Canvas component sits at the root of the UI tree. It works with the Canvas Scaler component to determine the sort order, rendering, and scaling mode of the UI underneath.
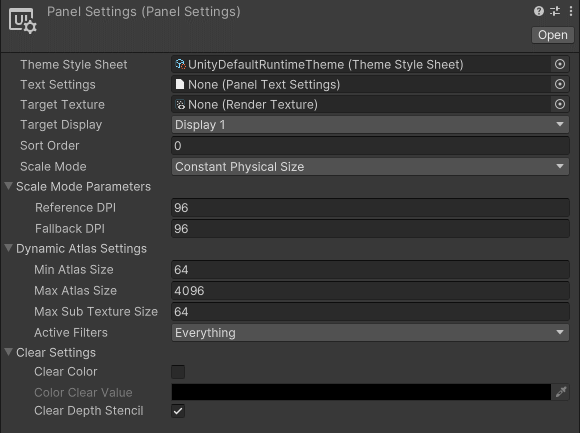
UI Toolkit では、UIDocument コンポーネントに PanelSettings オブジェクトへの参照が含まれています。PanelSettings には、スケールモードやソート順などの、UI のレンダリング設定が含まれています。複数の UIDocument コンポーネントが同じ PanelSettings オブジェクトを指すことができるので、同じシーンに複数の UI 画面を使用する場合にパフォーマンスが最適化されます。

In UGUI, the UI tree hierarchy sits underneath the GameObject holding the Canvas component. In UI Toolkit, the UIDocument component holds a reference to the root element of the Visual Tree.
UIDocument コンポーネントには、(ランタイムにビジュアルツリーが構築される基となる) UI レイアウトを定義する UXML ファイルへの参照も含まれています。詳しくは UI の作成 のセクションを参照してください。
| ノート: |
|---|
For Editor UI, no UIDocument component is needed. You can derive your custom class from EditorWindow, then implement CreateGUI(). For a practical example, see the guide on Creating custom Editor windows. |
GameObject Components versus Visual Elements
UI Toolkit では、UI 要素は “コントロール” または “ビジュアル要素” と呼ばれます。UI 要素には、例えば以下のようなものがあります。
- コントロール
- ボタン
- テキストラベル
UGUI builds the UI hierarchy from GameObjects. Adding new UI elements requires adding new GameObjects to the hierarchy. The individual controls are implemented as MonoBehaviour components.
In UI Toolkit, the Visual Tree is virtual and doesn’t use GameObjects. You can no longer build or view the UI hierarchy in the hierarchy view, but it removes the overhead of using a GameObject for each UI element.
In UGUI, UI elements derive (directly or indirectly) from the UIBehavior base class. Similarly, in UI Toolkit all UI elements derive from a base class called VisualElement. The key difference is the VisualElement class doesn’t derive from MonoBehaviour. You can not attach visual elements to GameObjects.
Working with UI Toolkit controls in script is similar to working with UGUI controls. The following table shows common script interactions with UI controls in UGUI, and their UI Toolkit counterparts.
| アクション | UGUI | UI Toolkit |
|---|---|---|
| ラベルにテキストを書き込む | m_Label.text = "My Text"; |
m_Label.text = "My Text"; |
| トグルの状態を読み取る | bool isToggleChecked = m_Toggle.isOn; |
bool isToggleChecked = m_Toggle.value; |
| ボタンへのコールバックの割り当て | m_Button.onClick.AddListener(MyCallbackFunc); |
m_Button.clicked += MyCallbackFunc_1;or m_Button.RegisterCallback<ClickEvent>(MyCallbackFunc_2);
|
コントロールとそのプロパティやイベントについての詳細は、コントロールの概要 のページを参照してください。
UI要素へのアクセス
In UGUI, there are two ways scripts can access UI elements:
- エディターで UI コンポーネントへの参照を割り当てる
-
GetComponentInChildren<T>()などのヘルパー関数を使用して、階層内でコンポーネントを見つける
UI Toolkit にはゲームオブジェクトやコンポーネントがないため、エディターでコントロールへの参照を直接割り当てることはできません。これらはランタイムにクエリ関数を使用して解決する必要があります。
代わりに、UIDocument コンポーネントを通してビジュアルツリーにアクセスします。
UIDocument is a MonoBehaviour, so you can assign it as a reference and make it part of a Prefab. The UIDocument component holds a reference to the root visual element. From the root, scripts can find child elements by type or by name, similar to UGUI.
以下の表は、Unity UI での UI コントロールへのアクセス方法と UI Toolkit での UI コントロールへのアクセス方法を直接比較したものです。
| アクション | UGUI | UI Toolkit |
|---|---|---|
| UI 要素を名前で探す | transform.FindChild("childName"); |
rootVisualElement.Query("childName"); |
| UI 要素のタイプ別検索 | transform.GetComponentInChildren<Button>(); |
rootVisualElement.Query<Button>(); |
| エディターでの参照の直接割り当て | 可 | 不可 |
UIの作成
One of the biggest differences between UGUI and UI Toolkit is the creation of user interfaces.
Both UGUI and UI Toolkit allow you to visually build the UI and preview it in the Editor. In UGUI, the UI is then saved inside a Prefab, along with any logic scripts attached to individual UI controls.
UI Toolkit では、UI レイアウトは UI Builder で作成され、1 つまたは複数の UXML ファイルとして保存されます。ランタイムに、UIDocument コンポーネントが、ビジュアルツリーがアセンブルした UXML ファイルをメモリにロードします。
For a method similar to UGUI, you can create UI controls directly from a script, then add them to a Visual Tree at runtime.
プレハブ
UGUI uses GameObjects for individual UI controls and Prefabs that both contain visuals and logic. UI Toolkit takes a different approach to reusability, as it separates logic and layout. You can create reusable UI components through UXML and custom controls.
UI Toolkit でプレハブに類似したテンプレートを作成するには、以下を行ってください。
- 部分的な UI 要素のための XML ファイルを作成します。
-
UIDocumentコンポーネントを持つゲームオブジェクトを作成します。 - そのゲームオブジェクト内で UXML ファイルを参照します。
- 同じゲームオブジェクトに、UI コンポーネントのロジックを処理するスクリプトを追加します。
- このゲームオブジェクトをプレハブとして保存します。
UI Layout
Arranging individual UI elements on screen in UGUI is a manual process. By default, UI controls are free floating and are only affected by their direct parent. Other UI controls under the same parent don’t affect their siblings positions or sizes. Pivots and anchors control the position and size of an element.
UI Toolkit のレイアウトシステムは、ウェブデザインの影響を受けており、自動レイアウト生成に基づいています。自動レイアウトシステムは、デフォルトで全ての要素に影響し、要素のサイズと位置は、同じ親の下にある他の要素に影響します。
The default behavior in UI Toolkit is comparable to placing all elements inside a VerticalLayoutGroup in UGUI, and adding a LayoutElement component to each.
You can disable automatic layout generation by changing the IStyle position property of the visual element. All visual elements have this property. See Visual Tree for a code sample.
UI Toolkit has no direct equivalents for anchoring and pivots of UI elements, due to the fundamental layout differences compared to UGUI.
The size and position of an element is controlled by the layout engine. To learn more about this, please see the Layout Engine documentation, and the Positioning section of the Visual Tree page.
レンダリングの順番
In UGUI, the order of the GameObjects in the hierarchy determines the rendering order. Objects further down in the hierarchy render last and appear on top. In a scene with multiple Canvases, the Sort Order on the root Canvas component determines the render order of the individual UI trees.
The render order in a Visual Tree in UI Toolkit operates the same way. Parent elements render before their children, and children render from the first to the last, so that the last appears on top. IUn a scene with multiple UI Documents, the render order is determined by the Sort Order setting on the root UIDocument component.
To change the rendering order of an element in UGUI, such as making an element appear on top, you can call the sibling functions on the Transform component of the GameObject. The VisualElement class offers comparable functions to control the rendering order. As all UI Toolkit controls derive from this class, all controls have access to this function.
The table below shows the UGUI functions to control render order and the equivalent functions in UI Toolkit:
| アクション | UGUI | UI Toolkit |
|---|---|---|
| 要素を他の兄弟の下にレンダリングする | transform.SetAsFirstSibling(); |
myVisualElement.SendToBack(); |
| 要素を他の兄弟の上にレンダリングする | transform.SetAsLastSibling(); |
myVisualElement.BringToFront(); |
| 要素の兄弟に対するレンダリング順序を手動で制御する | transform.SetSiblingIndex(newIndex); |
myVisualElement.PlaceBehind(sibling);myVisualElement.PlaceInFront(sibling);
|
イベント
Just like in UGUI, user interactions in UI Toolkit trigger events. The code can subscribe to receive a callback on events, such as pressing a button or moving a slider.
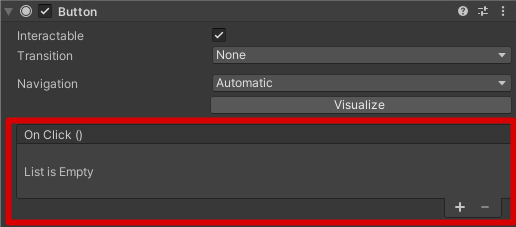
In UGUI, all UI elements are based on MonoBehaviour, and can expose their events in the Editor. This allows to set up logic with other GameObjects, for example to hide or unhide other UI elements, or to assign callback functions.

UI Toolkit では、ロジックと UI レイアウトが別々に保存されます。コールバックをゲームオブジェクトに直接設定したり、プレハブに保存することはできなくなりました。全てのコールバックはランタイムで設定し、スクリプティングによって処理する必要があります。
Button playButton = new Button("Play");
playButton.RegisterCallback<ClickEvent>(OnPlayButtonPressed);
...
private void OnPlayButtonPressed(ClickEvent evt)
{
  // Handle button press
}
The event dispatching system in UI Toolkit differs from events in UGUI. Depending on the event type, events aren’t just sent to the target UI control, but also to all the parent controls.
To learn more about this, see Events Dispatching.
Did you find this page useful? Please give it a rating:
Thanks for rating this page!
What kind of problem would you like to report?
Thanks for letting us know! This page has been marked for review based on your feedback.
If you have time, you can provide more information to help us fix the problem faster.
Provide more information
You've told us this page needs code samples. If you'd like to help us further, you could provide a code sample, or tell us about what kind of code sample you'd like to see:
You've told us there are code samples on this page which don't work. If you know how to fix it, or have something better we could use instead, please let us know:
You've told us there is information missing from this page. Please tell us more about what's missing:
You've told us there is incorrect information on this page. If you know what we should change to make it correct, please tell us:
You've told us this page has unclear or confusing information. Please tell us more about what you found unclear or confusing, or let us know how we could make it clearer:
You've told us there is a spelling or grammar error on this page. Please tell us what's wrong:
You've told us this page has a problem. Please tell us more about what's wrong:
Thank you for helping to make the Unity documentation better!
Your feedback has been submitted as a ticket for our documentation team to review.
We are not able to reply to every ticket submitted.