マニュアル
- Unity ユーザーマニュアル 2022.3 (LTS)
- Unity 2022 LTS の新機能
- パッケージと機能セット
- リリースパッケージ
- 2D Animation
- 2D Aseprite Importer
- 2D Pixel Perfect
- 2D PSD Importer
- 2D SpriteShape
- 2D Tilemap Extras
- Adaptive Performance
- Addressables
- Ads Mediation
- Advertisement Legacy
- AI Navigation
- Alembic
- Analytics
- Android Logcat
- Animation Rigging
- Apple ARKit XR Plugin
- AR Foundation
- Authentication
- Build Automation
- Burst
- CCD Management
- Cinemachine
- Cloud Code
- Cloud Diagnostics
- Cloud Save
- Code Coverage
- Collections
- Deployment
- Device Simulator Devices
- Economy
- Editor Coroutines
- Entities
- Entities Graphics
- FBX Exporter
- Google ARCore XR Plugin
- Unity の Havok Physics
- In App Purchasing
- Input System
- iOS 14 Advertising Support
- JetBrains Rider Editor
- Leaderboards
- Live Capture
- Lobby
- Localization
- Magic Leap XR Plugin
- Matchmaker
- Mathematics
- Memory Profiler
- ML Agents
- Mobile Notifications
- Multiplay
- Multiplayer Tools
- Netcode for Entities
- Netcode for GameObjects
- Oculus XR Plugin
- OpenXR Plugin
- プレイヤーアカウント
- Polybrush
- Post Processing
- ProBuilder
- Profile Analyzer
- Python Scripting
- レコーダー
- Relay
- Remote Config
- Scriptable Build Pipeline
- Sequences
- Serialization
- Splines
- Sysroot Base
- Sysroot Linux x64
- System Metrics Mali
- Terrain Tools
- Test Framework
- TextMeshPro
- Timeline
- Toolchain Linux x64
- Toolchain MacOS Linux x64
- Toolchain Win Linux x64
- Tutorial Authoring Tools
- Tutorial Framework
- Unity Distribution Portal (UDP)
- Unity Logging
- Unity Physics
- Unity Profiling Core API
- Unity Transport
- User Generated Content
- User Generated Content Bridge
- User Reporting
- Version Control
- Visual Scripting
- Visual Studio Code Editor
- Visual Studio Editor
- WebGL Publisher
- XR Hands
- XR Interaction Toolkit
- XR Plugin Management
- リリース候補
- プレリリースパッケージ
- コアパッケージ
- ビルトインパッケージ
- AI
- Android JNI
- Animation
- Asset Bundle
- Audio
- Cloth
- Director
- Image Conversion
- IMGUI
- JSONSerialize
- NVIDIA
- Particle System
- Physics
- Physics 2D
- Screen Capture
- Terrain
- Terrain Physics
- Tilemap
- UI
- UIElements
- Umbra
- Unity Analytics
- Unity Web Request
- Unity Web Request Asset Bundle
- Unity Web Request Audio
- Unity Web Request Texture
- Unity Web Request WWW
- Vehicles
- Video
- VR
- Wind
- XR
- 実験的パッケージ
- パッケージをキーワードで探す
- Unity の Package Manager
- Unity のパッケージ使用のしくみ
- 概念
- コンフィギュレーション
- Package Manager ウィンドウ
- Package Manager ウィンドウへのアクセス
- リストビュー
- 詳細ビュー
- 機能 (詳細) 表示
- パッケージと機能セットの検索
- 追加と削除
- Unity レジストリから機能セットをインストールする
- レジストリからパッケージをインストールする
- ローカルフォルダーからパッケージをインストールする
- ローカルの .tgz ファイルからパッケージをインストールする
- Git URL からパッケージをインストールする
- レジストリから名前を指定してパッケージをインストールする
- インストールされたパッケージをプロジェクトから削除する
- ビルトインパッケージの無効化
- 別のパッケージバージョンへの変更
- Asset Store パッケージのインポート
- Asset Store パッケージの更新
- インポートしたアセットをプロジェクトから削除する
- Asset Store のキャッシュからパッケージを削除する
- 複数のパッケージに対するアクションの実行
- パッケージドキュメントを探す
- パッケージの検査
- パッケージ用のスクリプティング API
- スコープ付きレジストリ
- 解決と競合
- プロジェクトマニフェスト
- トラブルシューティング
- カスタムパッケージの作成
- Feature (機能) セット
- リリースパッケージ
- Unity を使用する
- Unity のインストール
- Unity のアップグレード
- Unity のインターフェース
- クイックスタートガイド
- 高度なベストプラクティスガイド
- ゲームの作成
- エディター機能
- 分析
- Unity のメモリ
- プロファイラー概要
- アプリケーションのプロファイル
- よく使われるプロファイラーマーカー
- Profiler ウィンドウ
- Asset Loading Profiler モジュール
- Audio Profiler モジュール
- CPU Usage Profiler モジュール
- File Access Profiler モジュール
- Global Illumination Profiler モジュール
- GPU Usage Profiler モジュール
- Memory Profiler モジュール
- Physics プロファイラーモジュール
- Physics 2D Profiler モジュール
- Rendering Profiler モジュール
- UI Profiler と UI Details Profiler
- Video Profiler モジュール
- Virtual Texturing プロファイラーモジュール
- Profiler のカスタマイズ
- 低レベルのネイティブプラグイン Profiler API
- プロファイリングツール
- ログファイル
- Unity における最適化
- アセットローディングメトリクス
- アセットワークフロー
- 入力
- 2D ゲーム開発
- 2D の基本
- 2D ゲーム開発クイックスタートガイド
- 2D ソート
- スプライトの使用法
- タイルマップの作成
- 2D 物理演算リファレンス
- グラフィックス
- レンダーパイプライン
- カメラ
- ライティング
- モデル
- メッシュ
- テクスチャ
- シェーダー
- シェーダーの基礎概念
- ビルトインシェーダー
- Shader Graph の使用
- シェーダーの作成
- シェーダー作成の概要
- ShaderLab
- ShaderLab: シェーダーオブジェクトの定義
- ShaderLab: SubShader の定義
- ShaderLab: パスの定義
- ShaderLab: シェーダープログラムの追加
- ShaderLab: パッケージの要件を指定する
- ShaderLab: コマンド
- ShaderLab: Category ブロックによるコマンドのグループ化
- ShaderLab コマンド: AlphaToMask
- ShaderLab コマンド: Blend
- ShaderLab コマンド: BlendOp
- ShaderLab コマンド: ColorMask
- ShaderLab コマンド: Conservative
- ShaderLab コマンド: Cull
- ShaderLab コマンド: Offset
- ShaderLab コマンド: Stencil
- ShaderLab コマンド: UsePass
- ShaderLab コマンド: GrabPass
- ShaderLab コマンド: ZClip
- ShaderLab コマンド: ZTest
- ShaderLabコマンド: ZWrite
- ShaderLab の古い機能
- Unity での HLSL
- Unity での GLSL
- シェーダーの例
- サーフェスシェーダーの記述
- 様々なグラフィックス API のシェーダーの作成
- シェーダーのパフォーマンスについての理解
- マテリアル
- ビジュアルエフェクト
- ポストプロセス、フルスクリーンエフェクト
- パーティクルシステム
- パーティクルシステムソリューションの選択
- ビルトインのパーティクルシステム
- ビルトインパーティクルシステムの使用
- パーティクルシステム - 頂点ストリームとスタンダードシェーダーサポート
- パーティクルシステム GPU インスタンス
- パーティクルシステム C# Job System インテグレーション
- コンポーネントとモジュール
- パーティクルシステム
- Particle System モジュール
- メインモジュール
- Emission モジュール
- Shape モジュール
- Velocity over Lifetime モジュール
- Noise モジュール
- Limit Velocity over Lifetime モジュール
- Inherit Velocity モジュール
- Lifetime by Emitter Speed モジュール
- Force over Lifetime モジュール
- Color Over Lifetime モジュール
- Color By Speed モジュール
- Size over Lifetime モジュール
- Size by Speed モジュール
- Rotation over Lifetime モジュール
- Rotation by Speed モジュール
- External Forces モジュール
- Collision モジュール
- Triggers モジュール
- Sub Emitters モジュール
- Texture Sheet Animation モジュール
- Lights モジュール
- Trails モジュール
- Custom Data モジュール
- Renderer モジュール
- Particle System Force Field
- Visual Effect Graph
- デカールとプロジェクター
- レンズフレアとハロー
- ライン、トレイル、ビルボード
- 空
- 色
- グラフィックス API サポート
- グラフィックスのパフォーマンスとプロファイリング
- ゲーム世界の構築
- 物理演算
- スクリプト
- マルチプレイヤーとネットワーク
- オーディオ
- ビデオの概要
- アニメーション
- ユーザーインターフェース (UI)
- Unity の UI システムの比較
- UI Toolkit
- UI Toolkit について
- UI Builder
- UI の構築
- ビジュアルツリー
- UXML による UI の構築
- C# スクリプトによる UI の構築
- カスタムコントロール
- 要素管理のベストプラクティス
- UXML ドキュメントをロジックでカプセル化する
- UXML 要素のリファレンス
- UXML 要素 BindableElement
- UXML 要素 VisualElement
- UXML 要素 BoundsField
- UXML 要素 BoundsIntField
- UXML 要素 Box
- UXML 要素 Button
- UXML 要素 ColorField
- UXML 要素 CurveField
- UXML 要素 DoubleField
- UXML 要素 DropdownField
- UXML 要素 EnumField
- UXML 要素 EnumFlagsField
- UXML 要素 FloatField
- UXML 要素 Foldout
- UXML要素 GradientField
- UXML 要素 GroupBox
- UXML 要素 Hash128Field
- UXML 要素 HelpBox
- UXML 要素 IMGUIContainer
- UXML 要素 Image
- UXML 要素 InspectorElement
- UXML 要素 IntegerField
- UXML 要素 Label
- UXML 要素 LayerField
- UXML 要素 LayerMaskField
- UXML 要素 LongField
- UXML 要素 ListView
- UXML 要素 MaskField
- UXML 要素 MinMaxSlider
- UXML 要素 MultiColumnListView
- UXML 要素 MultiColumnTreeView
- UXML 要素 ObjectField
- UXML 要素 PopupWindow
- UXML 要素 ProgressBar
- UXML 要素 PropertyField
- UXML 要素 RadioButton
- UXML 要素 RadioButtonGroup
- UXML 要素 RectField
- UXML 要素 RectIntField
- UXML 要素 RepeatButton
- UXML 要素 ScrollView
- UXML 要素 Scroller
- UXML 要素 Slider
- UXML 要素 SliderInt
- UXML 要素 TagField
- UXML 要素 TextElement
- UXML 要素 TextField
- UXML 要素 Toggle
- UXML 要素 Toolbar
- UXML 要素 ToolbarBreadcrumbs
- UXML 要素 ToolbarButton
- UXML 要素 ToolbarMenu
- UXML 要素 ToolbarPopupSearchField
- UXML 要素 ToolbarSearchField
- UXML 要素 ToolbarSpacer
- UXML 要素 ToolbarToggle
- UXML 要素 TreeView
- UXML 要素 TwoPaneSplitView
- UXML 要素 UnsignedIntegerField
- UXML 要素 UnsignedLongField
- UXML 要素 Vector2Field
- UXML 要素 Vector2IntField
- UXML 要素 Vector3Field
- UXML 要素 Vector3IntField
- UXML 要素 Vector4Field
- UI 構築の例
- UI のスタイル設定
- UI Toolkit Debugger
- イベントによる動作の制御
- UI Renderer
- エディター UI のサポート
- ランタイム UI のサポート
- テキストを扱う
- 例
- 移行ガイド
- Unity UI
- IMGUI (即時モードの GUI)
- Unity Services
- XR
- Unity の Asset Store
- プラットフォーム特有の情報
- Unity as a Library を他のアプリケーションで使用
- ディープリンク
- Xcode フレームデバッガーのインテグレーション
- Android
- Android について
- Android 用の開発を始める
- Android 用の開発
- Android 用のビルドと提出
- Chrome OS
- Dedicated Server
- iOS
- Linux
- macOS
- tvOS
- WebGL
- Windows
- ユニバーサル Windows プラットフォーム
- ユニバーサル Windows プラットフォームについて
- ユニバーサル Windows プラットフォーム用の開発を始める
- ユニバーサル Windows プラットフォーム用の開発
- ユニバーサル Windows プラットフォーム用のビルドと提供
- Unity Search
- 古いナビゲーションと経路探索
- ナビゲーションの概要
- ナビゲーション リファレンス
- ナビゲーションの使いかた
- 用語集
- Unity ユーザーマニュアル 2022.3 (LTS)
- ユーザーインターフェース (UI)
- UI Toolkit
- UI Toolkit について
UI Toolkit について
UI Toolkit で初めての UI を作る場合は、この基本 UI Toolkit ワークフロー例を参考にしてください。
ノート: デモンストレーションの目的で、このページではエディター UI の UI コントロールを追加する方法を説明します。ただし、UI ドキュメントに UI コントロールを追加する手順は、ランタイム UI にも適用されます。詳しくは、ランタイム UI について を参照してください。
特定の作業を頻繁に行う場合、UI Toolkit を使ってその作業専用の UI を作成することができます。例えば、カスタムのエディターウィンドウを作成できます。 この例では、カスタムエディターウィンドウを作成し、UI ビルダー、UXML、C# スクリプトを使用してカスタムエディターウィンドウに UI コントロールを追加する方法を示します。
この例で作成するすべてのファイルは、GitHub リポジトリ にあります。
カスタムエディターウィンドウの作成
- Unity エディターで任意のテンプレートを使ってプロジェクトを作成します。
- Project ウィンドウで右クリックし、
Assetsフォルダー内で右クリックし、Create > UI Toolkit > Editor Window を選択します。 -
UI Toolkit Editor Window Creator に
MyCustomEditorと入力します。 - USS チェックボックスを解除します。
- Continue をクリックします。
これにより、2 つのラベルを持つカスタムのエディターウィンドウが作成されます。エディターウィンドウはメニューから開くことができます (Window > UI Toolkit > MyCustomEditor)。ソースファイルは Assets/Editor フォルダーにあります。
UI コントロールをウィンドウに加える
以下の方法で UI コントロールをウィンドウに加えることができます。
- UI Builder を使用して UI コントロールを視覚的に加える
- XML に似たテキストファイル (UXML) を使って UI コントロールを追加える
- C# スクリプトを使用して UI コントロールを加える
これらの方法は、個別でも、組み合わでも使用することもできます。以下の例では、これらのメソッドを組み合わせて、3 組のラベル、ボタン、トグルを作成します。
UI Builder を使用して UI コントロールを加える
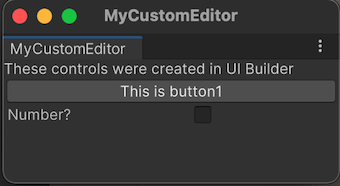
UI コントロールをウィンドウに視覚的に加えるには、UI Builder を使用します。以下のステップは、デフォルトのラベルに加えて、ボタンとトグルをカスタムエディターウィンドウに加えます。
-
Editorフォルダーで、MyCustomEditor.uxmlをダブルクリックして、UI Builder を開きます。 - UI Builder で、Button と Toggle を Library > Controls から Hierarchy または **Viewport のウィンドウプレビューにドラッグしてください。
- Hierarchy ウィンドウで、Label を選択します。
- Inspector ウィンドウの Text フィールドで、デフォルトのテキストを
These controls were created in UI Builderに変更します。 - Hierarchy ウィンドウで、Button を選択します。
- Inspector ウィンドウで、Text フィールドに
This is button1と入力します。 -
Name フィールドに
button1と入力します。 - Hierarchy ウィンドウで、Toggle を選択します。
- Inspector ウィンドウの Label フィールドに
Number?を入力します。 -
Name フィールドに
toggle1と入力します。 - 保存 して、UI Builder ウィンドウを閉じます。
- カスタムエディターウィンドウを閉じていない場合は閉じてください。
- Window > UI Toolkit > MyCustomEditor を選択し、カスタムエディターウィンドウを再度開いて、追加したボタンとトグルを確認します。

UXML を使用して UI コントロールを加える
テキストファイルで UI を定義したい場合は、UXML を編集して UI コントロールを追加できます。以下のステップでは、もう一揃いのラベル、ボタン、トグルをウィンドウに追加します。
Editorフォルダーで、Assets > Create > UI Toolkit > UI Document をクリックして、MyCustomEditor_UXML.uxmlという UXML ファイルを作成します。Project ウィンドウの
MyCustomEditor_UXML.uxmlの矢印をクリックします。inlineStyleをダブルクリックして、テキストエディターでMyCustomEditor_UXML.uxmlを開きます。-
MyCustomEditor_UXML.uxmlのコンテンツを以下のように置き換えます。<?xml version="1.0" encoding="utf-8"?> <engine:UXML xmlns:xsi="http://www.w3.org/2001/XMLSchema-instance" xmlns:engine="UnityEngine.UIElements" xmlns:editor="UnityEditor.UIElements" xsi:noNamespaceSchemaLocation="../../UIElementsSchema/UIElements.xsd" > <engine:Label text="These controls were created with UXML." /> <engine:Button text="This is button2" name="button2"/> <engine:Toggle label="Number?" name="toggle2"/> </engine:UXML> MyCustomEditor.csを開きます。-
MyCustomEditorクラスにm_UXMLTreeという名の private のVisualTreeAssetフィールドを追加します。その上に[SerializeField]という属性を付けます。[SerializeField] private VisualTreeAsset m_UXMLTree; -
CreateGUI()の末尾に以下のコードを追加します。root.Add(m_UXMLTree.Instantiate()); Project ウィンドウで
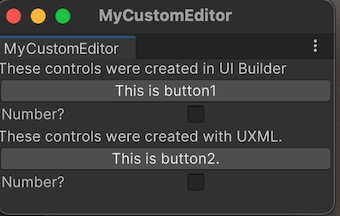
MyCustomEditor.csを選択します。MyCustomEditor_UXML.uxmlを Project ウィンドウから Inspector の UXML Tree フィールドにドラッグします。これで、UXML がビジュアルツリーに割り当てられます。Window > UI Toolkit > MyCustomEditor を選択します。これにより、3 つのラベル、2 つのボタン、2 つのトグルを持つカスタムエディターウィンドウが開きます。

C# スクリプトを使用して UI コントロールを加える
コーディングを使いたい場合は、C# スクリプトでウィンドウに UI コントロールを加えられます。このステップでは、もう一揃いのラベル、ボタン、トグルをウィンドウに追加します。
MyCustomEditor.csを開きます。-
Unity では、ラベル、ボタン、トグルなどの基本的な UI コントロールに
UnityEngine.UIElementsを使用します。UI コントロールを使用するには、(まだ存在しない場合は) 以下の宣言を加える必要があります。using UnityEngine.UIElements; 既存のラベルのテキストを
"Hello World!From C#"から"These controls were created using C# code."に変えます。-
EditorWindow クラスには
rootVisualElementと呼ばれるプロパティがあります。UI コントロールをウィンドウに追加するには、まず、いくつかの属性を持つ要素クラスをインスタンス化し、rootVisualElementのAddメソッドを使用します。完成した
CreateGUI()メソッドは、以下のようになります。public void CreateGUI() { // Each editor window contains a root VisualElement object VisualElement root = rootVisualElement; // VisualElements objects can contain other VisualElements following a tree hierarchy. Label label = new Label("These controls were created using C# code."); root.Add(label); Button button = new Button(); button.name = "button3"; button.text = "This is button3."; root.Add(button); Toggle toggle = new Toggle(); toggle.name = "toggle3"; toggle.label = "Number?"; root.Add(toggle); // Import UXML var visualTree = AssetDatabase.LoadAssetAtPath<VisualTreeAsset>("Assets/Editor/MyCustomEditor.uxml"); VisualElement labelFromUXML = visualTree.Instantiate(); root.Add(labelFromUXML); } カスタムエディターウィンドウを閉じていない場合は閉じてください。
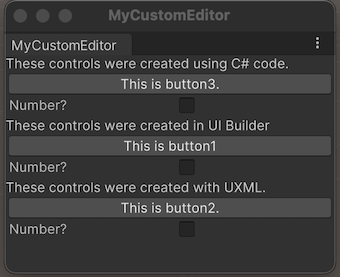
Window > UI Toolkit > MyCustomEditor を選択し、カスタムエディターウィンドウを再度開いて、追加した 3 つのラベル、3 つのボタン、3 つのトグルを確認します。

UI コントロールの動作を定義する
UI コントロールにイベントハンドラーを設定すると、ボタンをクリックしたときや、トグルを選択/クリアしたときに、UI コントロールが何らかのタスクを実行します。
この例では、以下のようなイベントハンドラーを設定します。
- ボタンをクリックすると、エディターコンソールにメッセージが表示されます。
- トグルを選択すると、ボタンが何回クリックされたかがコンソールに表示されます。
完成した MyCustomEditor.cs ファイルは、以下のようになります。
using UnityEditor;
using UnityEngine;
using UnityEngine.UIElements;
public class MyCustomEditor : EditorWindow
{
[MenuItem("Window/UI Toolkit/MyCustomEditor")]
public static void ShowExample()
{
MyCustomEditor wnd = GetWindow<MyCustomEditor>();
wnd.titleContent = new GUIContent("MyCustomEditor");
}
[SerializeField]
private VisualTreeAsset m_UXMLTree;
private int m_ClickCount = 0;
private const string m_ButtonPrefix = "button";
public void CreateGUI()
{
// Each editor window contains a root VisualElement object
VisualElement root = rootVisualElement;
// VisualElements objects can contain other VisualElement following a tree hierarchy.
Label label = new Label("These controls were created using C# code.");
root.Add(label);
Button button = new Button();
button.name = "button3";
button.text = "This is button3.";
root.Add(button);
Toggle toggle = new Toggle();
toggle.name = "toggle3";
toggle.label = "Number?";
root.Add(toggle);
// Import UXML
var visualTree = AssetDatabase.LoadAssetAtPath<VisualTreeAsset>("Assets/Editor/MyCustomEditor.uxml");
VisualElement labelFromUXML = visualTree.Instantiate();
root.Add(labelFromUXML);
root.Add(m_UXMLTree.Instantiate());
//Call the event handler
SetupButtonHandler();
}
//Functions as the event handlers for your button click and number counts
private void SetupButtonHandler()
{
VisualElement root = rootVisualElement;
var buttons = root.Query<Button>();
buttons.ForEach(RegisterHandler);
}
private void RegisterHandler(Button button)
{
button.RegisterCallback<ClickEvent>(PrintClickMessage);
}
private void PrintClickMessage(ClickEvent evt)
{
VisualElement root = rootVisualElement;
++m_ClickCount;
//Because of the names we gave the buttons and toggles, we can use the
//button name to find the toggle name.
Button button = evt.currentTarget as Button;
string buttonNumber = button.name.Substring(m_ButtonPrefix.Length);
string toggleName = "toggle" + buttonNumber;
Toggle toggle = root.Q<Toggle>(toggleName);
Debug.Log("Button was clicked!" +
(toggle.value ? " Count: " + m_ClickCount : ""));
}
}
- 例を試すには、Window > UI Toolkit > MyCustomEditor を選択します。
その他の参考資料
Did you find this page useful? Please give it a rating:
Thanks for rating this page!
What kind of problem would you like to report?
Thanks for letting us know! This page has been marked for review based on your feedback.
If you have time, you can provide more information to help us fix the problem faster.
Provide more information
You've told us this page needs code samples. If you'd like to help us further, you could provide a code sample, or tell us about what kind of code sample you'd like to see:
You've told us there are code samples on this page which don't work. If you know how to fix it, or have something better we could use instead, please let us know:
You've told us there is information missing from this page. Please tell us more about what's missing:
You've told us there is incorrect information on this page. If you know what we should change to make it correct, please tell us:
You've told us this page has unclear or confusing information. Please tell us more about what you found unclear or confusing, or let us know how we could make it clearer:
You've told us there is a spelling or grammar error on this page. Please tell us what's wrong:
You've told us this page has a problem. Please tell us more about what's wrong:
Thank you for helping to make the Unity documentation better!
Your feedback has been submitted as a ticket for our documentation team to review.
We are not able to reply to every ticket submitted.